

 本記事は TechHarmony Advent Calendar 12/23付の記事です。 本記事は TechHarmony Advent Calendar 12/23付の記事です。 |
こんにちは、広野です。
以前、別の記事で MUI から React のサンプルアプリが公開されていると紹介したことがあります。MUI をどのように使用するのか具体的なイメージを掴んでもらうためのサンプルだと思うのですが、なにげに React の学習用としても利用価値があると考えています。
今回は、その MUI 提供の React サンプルアプリを AWS Amplify 上で立ち上げる方法を紹介します。データベース無し、フロントエンドのみで動くサンプルになっているところも使い勝手の良い点です。
私自身、React と AWS サーバーレス関連のブログを書く上で、React のサンプルアプリがないと説明がしづらくなってきましたので、副産物的な目的として、私の今後のブログの参照先としても本記事は活用したいと思います。
やりたいこと
動かしたいサンプルアプリは以下です。

これを、自分の AWS 学習用環境で動かしたいです。
※アプリ稼働環境は AWS である必要はないのですが、AWS の学習も兼ねて、目標をそのようにセットします。
アーキテクチャ
アーキテクチャと言うほどではないのですが、以下の AWS サービスを使用します。
AWS でサーバーレスアプリケーション開発をするときの一般的なプラクティスです。
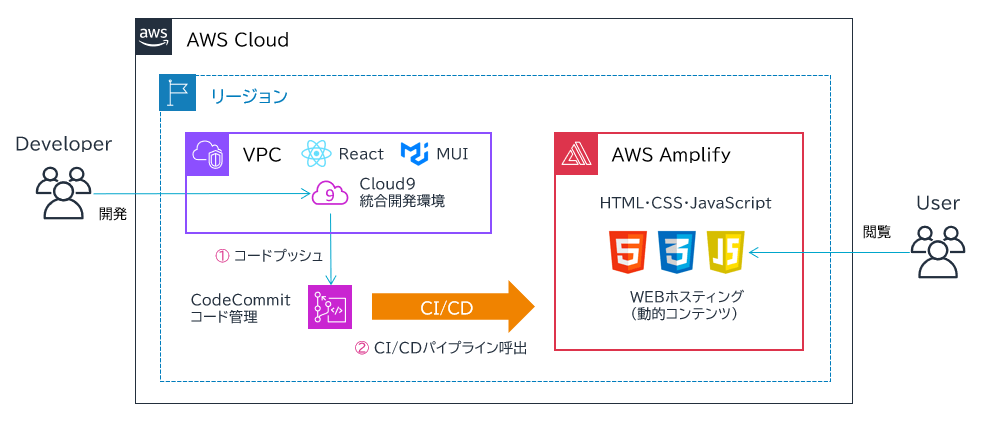
- 開発環境は AWS Cloud9 を使用します。
- Cloud9 内で MUI の React サンプルアプリを編集し、AWS CodeCommit にプッシュします。
- CodeCommit に関連付けられた AWS Amplify に自動的にビルド、デプロイされます。
執筆時点の使用ランタイム、モジュールバージョンは以下です。バージョンは日々アップデートされいきますので、将来的にバージョン間の互換性の問題が発生する可能性があります。
- React 18.2.0
- Node.js 20.10.0
- npm 10.2.5
- Cloud9 の OS: Amazon Linux 2023
サンプルアプリ立ち上げ手順
サンプルアプリコードダウンロード
以下のサイトから、必要なコードのファイルをダウンロードします。本記事では、ブログサンプルを対象とします。
もしリンク切れしていましたら、こちらから探してみてください。
必要なファイルは以下です。本記事では、TypeScript 版ではなく JavaScript 版を使用します。
- Blog.js ※このファイルはこのままでは動かないため、後ほど修正箇所を紹介します。
- FeaturedPost.js
- Footer.js
- Header.js
- Main.js
- MainFeaturedPost.js
- Markdown.js
- Sidebar.js
- blog-post1.md
- blog-post2.md
- blog-post3.md
開発環境構築
AWS Cloud9 と AWS CodeCommit を使用します。こちらは世の中に多くのナレッジがあるため、詳細な手順は割愛します。
以下の AWS 公式サイトを参考に、空の AWS CodeCommit リポジトリに連携した AWS Cloud9 を立ち上げて頂ければと思います。


モジュールインストール
AWS Cloud9 を立ち上げ、順番に実施していきましょう。
Node.js バージョン確認
まず、AWS Cloud9 上にインストールされている Node.js のバージョンを確認します。執筆時点では、デフォルトでバージョン 20 が使用されていました。
インストールされている Node.js バージョン確認
node -v
Node.js の存在バージョン確認
nvm ls-remote
Node.js 20 最新バージョンインストール (例)
nvm install v20.10.0
nvm alias default v20.10.0
npm バージョン確認
インストールされている npm バージョン確認
npm -v
npm の最新バージョンインストール
npm install -g npm@latest
React・MUI 関連モジュールインストール
create-react-app という標準的な React 環境をセットアップしてくれるモジュールをインストールします。ここでは、AWS CodeCommit とソースコードを同期したディレクトリにインストールします。(例: reactapp)
create-react-app reactapp
完了すると、以下のようなディレクトリ状態になります。
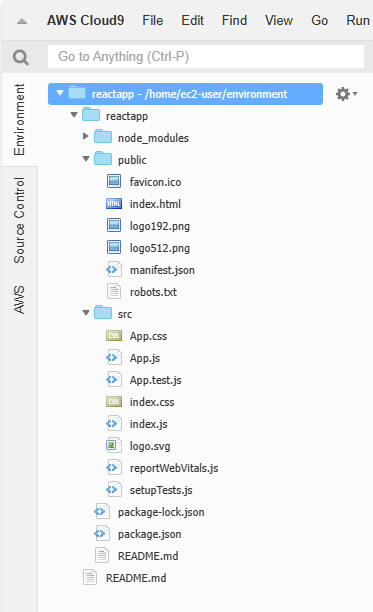
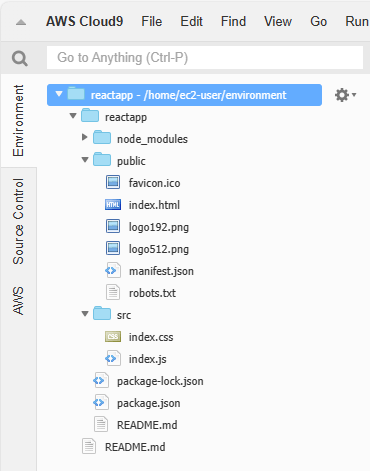
デフォルトでサンプルソースコードが入っているので、src 配下の不要なファイルを削除します。
- App.css
- App.js
- App.test.js
- logo.svg
- reportWebVitals.js
- setupTests.js
すっきりしました。
続いて、不要なモジュールを削除するコマンドを実行します。React をインストールしたディレクトリ (ここでは reactapp) に移動して、モジュール削除コマンドを実行します。
cd reactapp
npm remove web-vitals @testing-library/jest-dom @testing-library/react @testing-library/user-event
追加で必要となるモジュールをインストールします。
npm install --save @mui/material @mui/icons-material @emotion/react @emotion/styled markdown-to-jsx prop-types axios
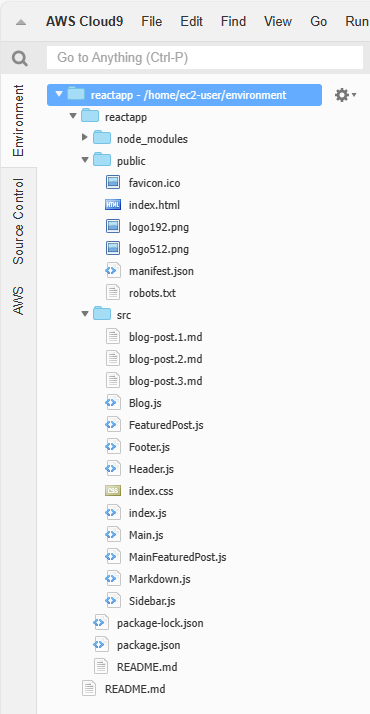
ソースコード配置・修正
src ディレクトリ配下に、ダウンロードしておいたサンプルアプリコードを全て配置します。こんな感じになります。
ただし、このままでは動かないので、ファイルを修正します。以下は修正後の状態です。
- index.js
import React from 'react';
import ReactDOM from 'react-dom/client';
import './index.css';
import Blog from './Blog';

const root = ReactDOM.createRoot(document.getElementById('root'));
root.render(
  <React.StrictMode>
    <Blog />
  </React.StrictMode>
);
index.js は画面を表示したときに最初に実行されるスクリプトです。create-react-app 実行直後は App.js が呼び出されるようになっていたのですが、MUI サンプルアプリを呼び出すために Blog.js を呼び出すように書き換えています。また、不要なコードを削除しています。
- Blog.js
下線を引いた箇所を修正または追記しています。
import * as React from 'react';
import CssBaseline from '@mui/material/CssBaseline';
import Grid from '@mui/material/Grid';
import Container from '@mui/material/Container';
import GitHubIcon from '@mui/icons-material/GitHub';
import FacebookIcon from '@mui/icons-material/Facebook';
import TwitterIcon from '@mui/icons-material/Twitter';
import { createTheme, ThemeProvider } from '@mui/material/styles';
import Header from './Header';
import MainFeaturedPost from './MainFeaturedPost';
import FeaturedPost from './FeaturedPost';
import Main from './Main';
import Sidebar from './Sidebar';
import Footer from './Footer';
import post1 from './blog-post.1.md';
import post2 from './blog-post.2.md';
import post3 from './blog-post.3.md';
import axios from 'axios';

const sections = [
  { title: 'Technology', url: '#' },
  { title: 'Design', url: '#' },
  { title: 'Culture', url: '#' },
  { title: 'Business', url: '#' },
  { title: 'Politics', url: '#' },
  { title: 'Opinion', url: '#' },
  { title: 'Science', url: '#' },
  { title: 'Health', url: '#' },
  { title: 'Style', url: '#' },
  { title: 'Travel', url: '#' },
];

const mainFeaturedPost = {
  title: 'Title of a longer featured blog post',
  description:
    "Multiple lines of text that form the lede, informing new readers quickly and efficiently about what's most interesting in this post's contents.",
  image: 'https://source.unsplash.com/random?wallpapers',
  imageText: 'main image description',
  linkText: 'Continue reading…',
};

const featuredPosts = [
  {
    title: 'Featured post',
    date: 'Nov 12',
    description:
      'This is a wider card with supporting text below as a natural lead-in to additional content.',
    image: 'https://source.unsplash.com/random?wallpapers',
    imageLabel: 'Image Text',
  },
  {
    title: 'Post title',
    date: 'Nov 11',
    description:
      'This is a wider card with supporting text below as a natural lead-in to additional content.',
    image: 'https://source.unsplash.com/random?wallpapers',
    imageLabel: 'Image Text',
  },
];

//const posts = [post1, post2, post3];

const sidebar = {
  title: 'About',
  description:
    'Etiam porta sem malesuada magna mollis euismod. Cras mattis consectetur purus sit amet fermentum. Aenean lacinia bibendum nulla sed consectetur.',
  archives: [
    { title: 'March 2020', url: '#' },
    { title: 'February 2020', url: '#' },
    { title: 'January 2020', url: '#' },
    { title: 'November 1999', url: '#' },
    { title: 'October 1999', url: '#' },
    { title: 'September 1999', url: '#' },
    { title: 'August 1999', url: '#' },
    { title: 'July 1999', url: '#' },
    { title: 'June 1999', url: '#' },
    { title: 'May 1999', url: '#' },
    { title: 'April 1999', url: '#' },
  ],
  social: [
    { name: 'GitHub', icon: GitHubIcon },
    { name: 'Twitter', icon: TwitterIcon },
    { name: 'Facebook', icon: FacebookIcon },
  ],
};

// TODO remove, this demo shouldn't need to reset the theme.
const defaultTheme = createTheme();

export default function Blog() {
  const [poststate1, setPoststate1] = React.useState();
  const [poststate2, setPoststate2] = React.useState();
  const [poststate3, setPoststate3] = React.useState();

  React.useEffect(() => {
    axios.get(post1).then(res => setPoststate1(res.data));
    axios.get(post2).then(res => setPoststate2(res.data));
    axios.get(post3).then(res => setPoststate3(res.data));
  }, []);

  return (
    <ThemeProvider theme={defaultTheme}>
      <CssBaseline />
      <Container maxWidth="lg">
        <Header title="Blog" sections={sections} />
        <main>
          <MainFeaturedPost post={mainFeaturedPost} />
          <Grid container spacing={4}>
            {featuredPosts.map((post) => (
              <FeaturedPost key={post.title} post={post} />
            ))}
          </Grid>
          <Grid container spacing={5} sx={{ mt: 3 }}>
            {(poststate1 && poststate2 && poststate3) && <Main title="From the firehose" posts={[poststate1,poststate2,poststate3]} />}
            <Sidebar
              title={sidebar.title}
              description={sidebar.description}
              archives={sidebar.archives}
              social={sidebar.social}
            />
          </Grid>
        </main>
      </Container>
      <Footer
        title="Footer"
        description="Something here to give the footer a purpose!"
      />
    </ThemeProvider>
  );
}
サンプルコードでは、md ファイル (マークダウン言語で書かれたドキュメント) を import というコマンドでロードして画面に表示するように書かれているのですが、ダウンロードしたコードをそのまま使用しても表示されません。代替策として axios というモジュールを使用して md ファイルをロードするよう書き換えています。
ここまでできましたら、AWS Cloud9 で編集したこれらコードを AWS CodeCommit に同期します。以下コマンドを使用します。
git add -A
git commit -m "initial commit"
git push origin master
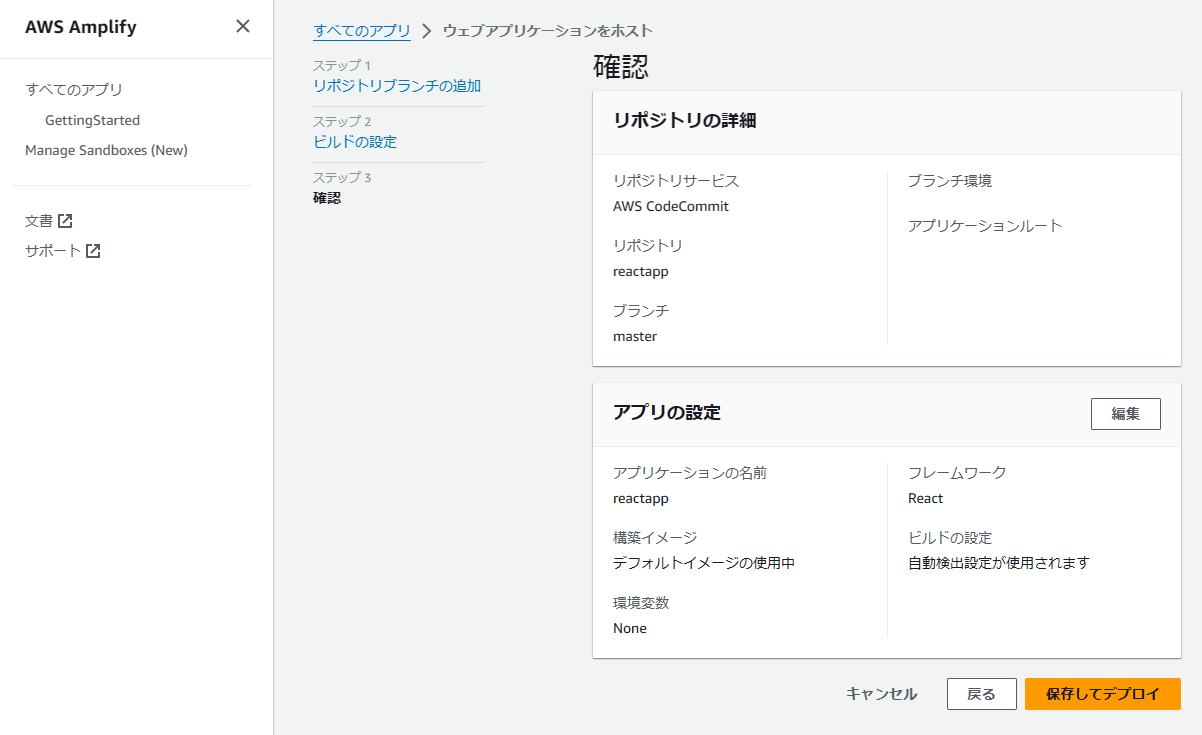
AWS Amplify 環境構築
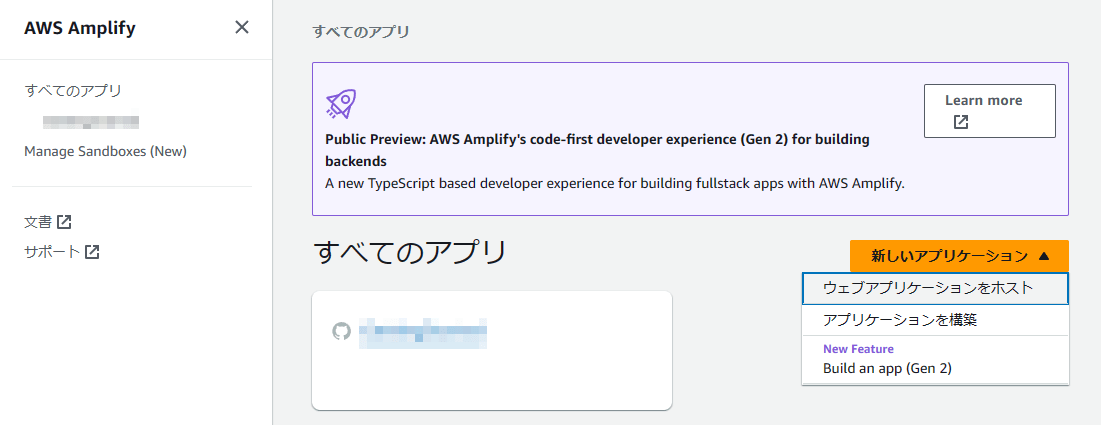
AWS マネジメントコンソールで、AWS Amplify を表示します。ウェブアプリケーションをホストします。
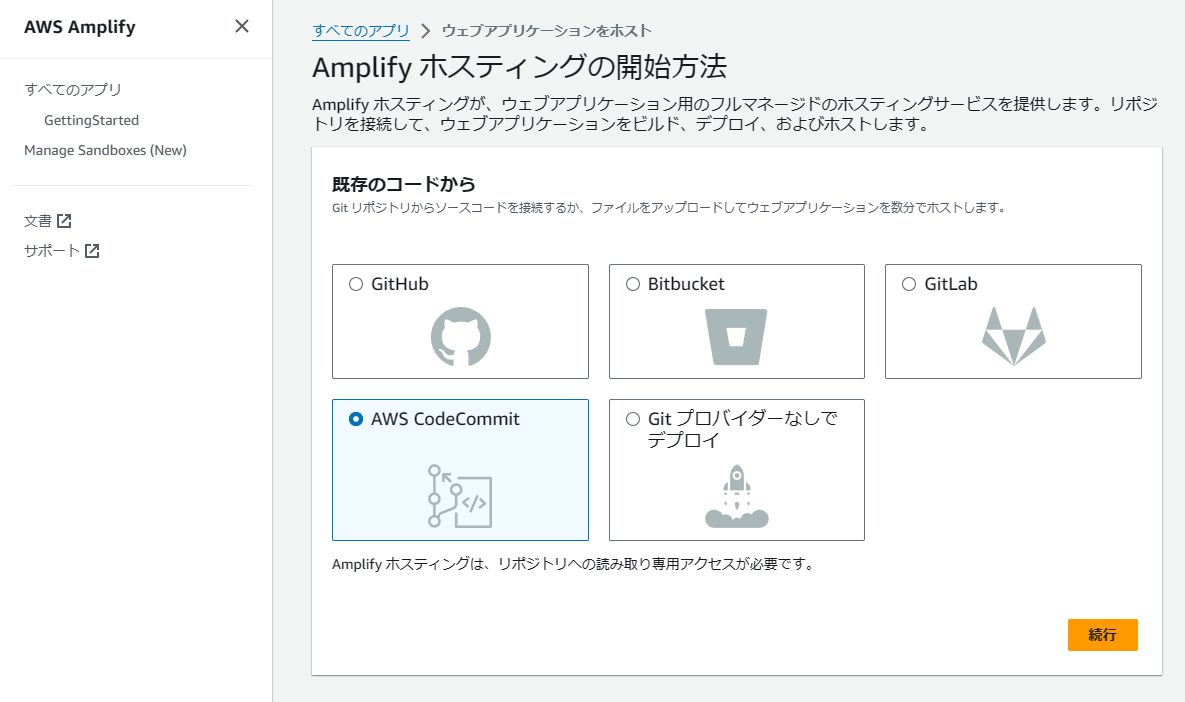
AWS CodeCommit を選択します。
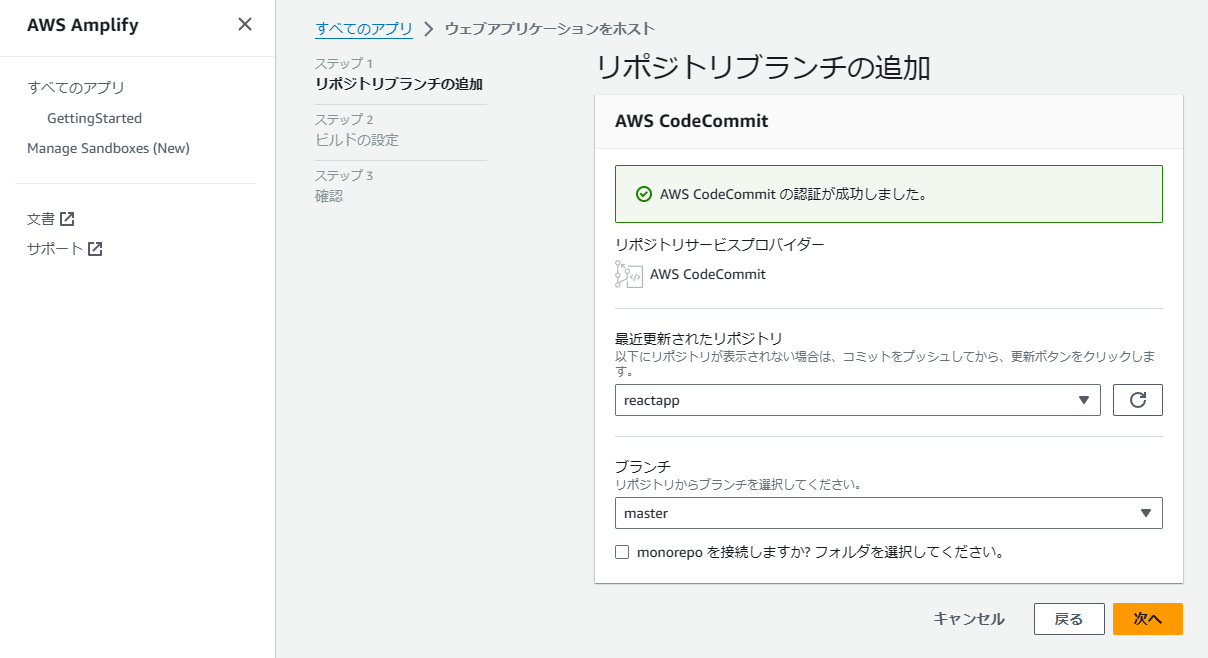
使用している AWS CodeCommit リポジトリを選択します。
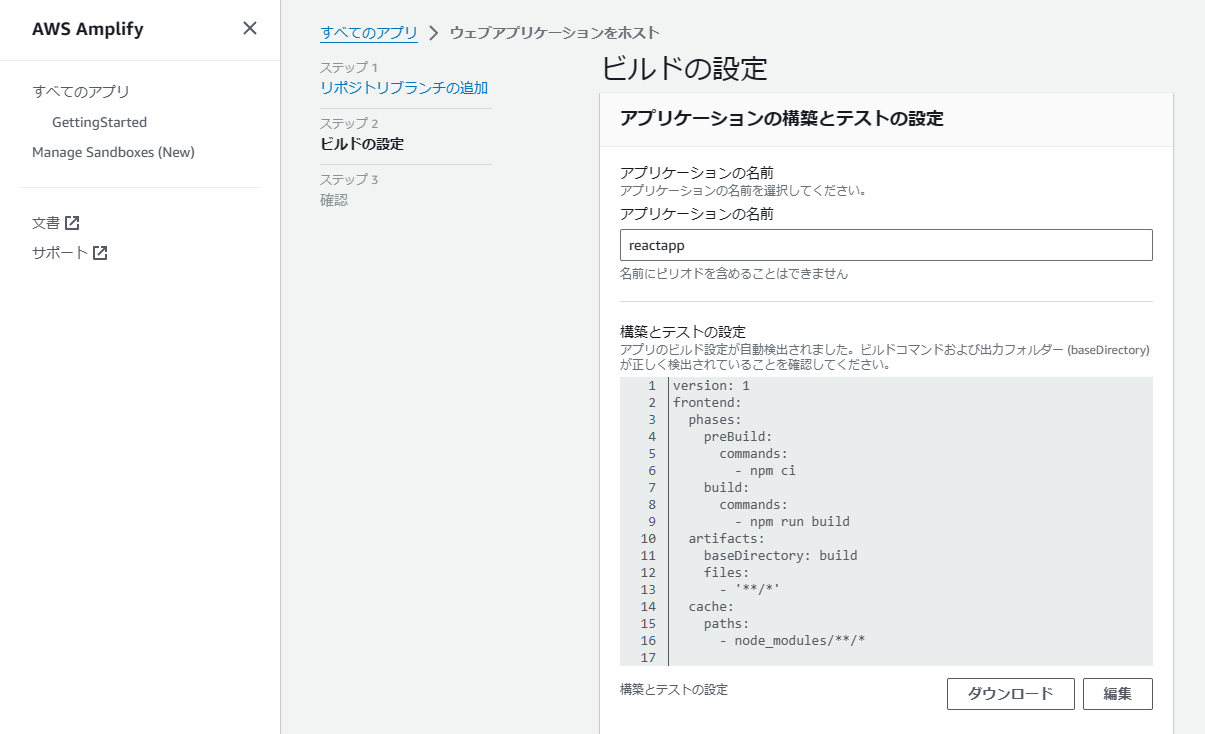
AWS CodeCommit に格納されているコードから、React であることを自動判別してくれます。それに沿って必要なビルド設定をデフォルトで用意してくれるので、そのまま先に進みます。
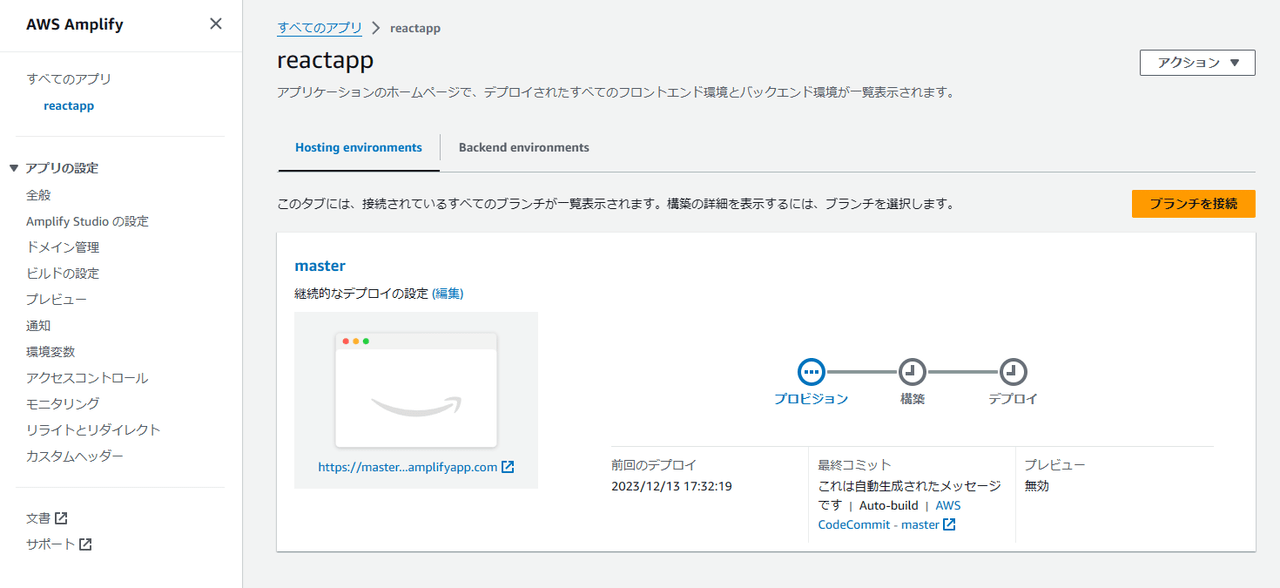
デプロイが進みます。完了するとパイプラインの色が全て緑色になりますので、画面に表示されている URL をクリックすると、アプリが表示されます。
ただし、そのままでは画面の一部がエラーになってしまいます。Amplify 画面のメニューで、「リライトとリダイレクト」の設定を変更します。
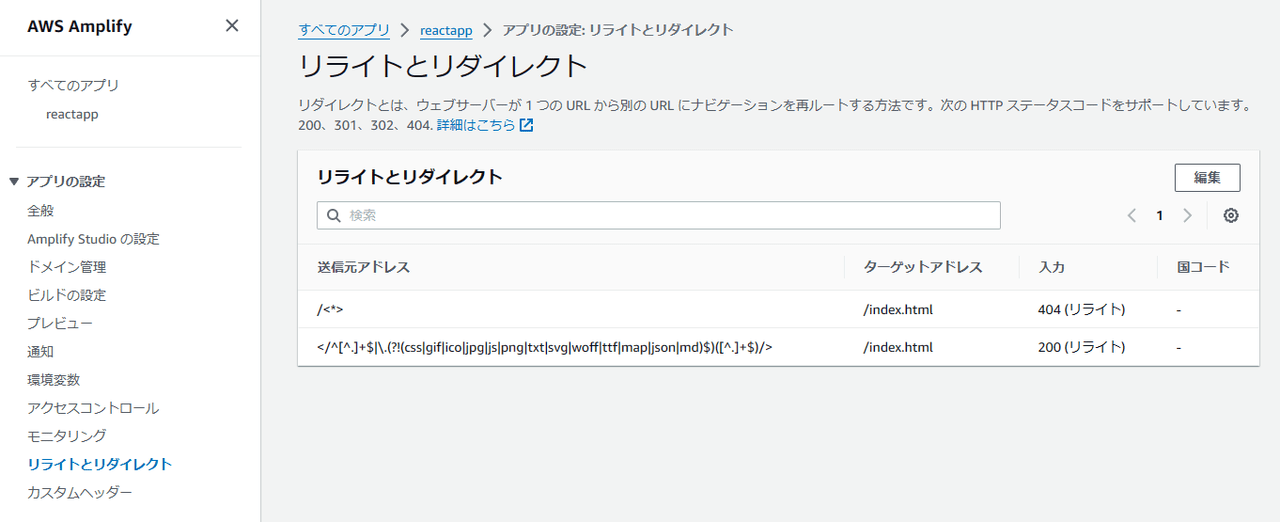
この中で、以下の赤線部分を追記して保存します。
</^[^.]+$|\.(?!(css|gif|ico|jpg|js|png|txt|svg|woff|ttf|map|json|md)$)([^.]+$)/>
デフォルトのままでは、コードに書かれている axios で MD ファイルにアクセスする部分がブロックされてしまいます。拡張子が .md のファイルにアクセスできるよう、Amplify に登録してあげる必要があります。
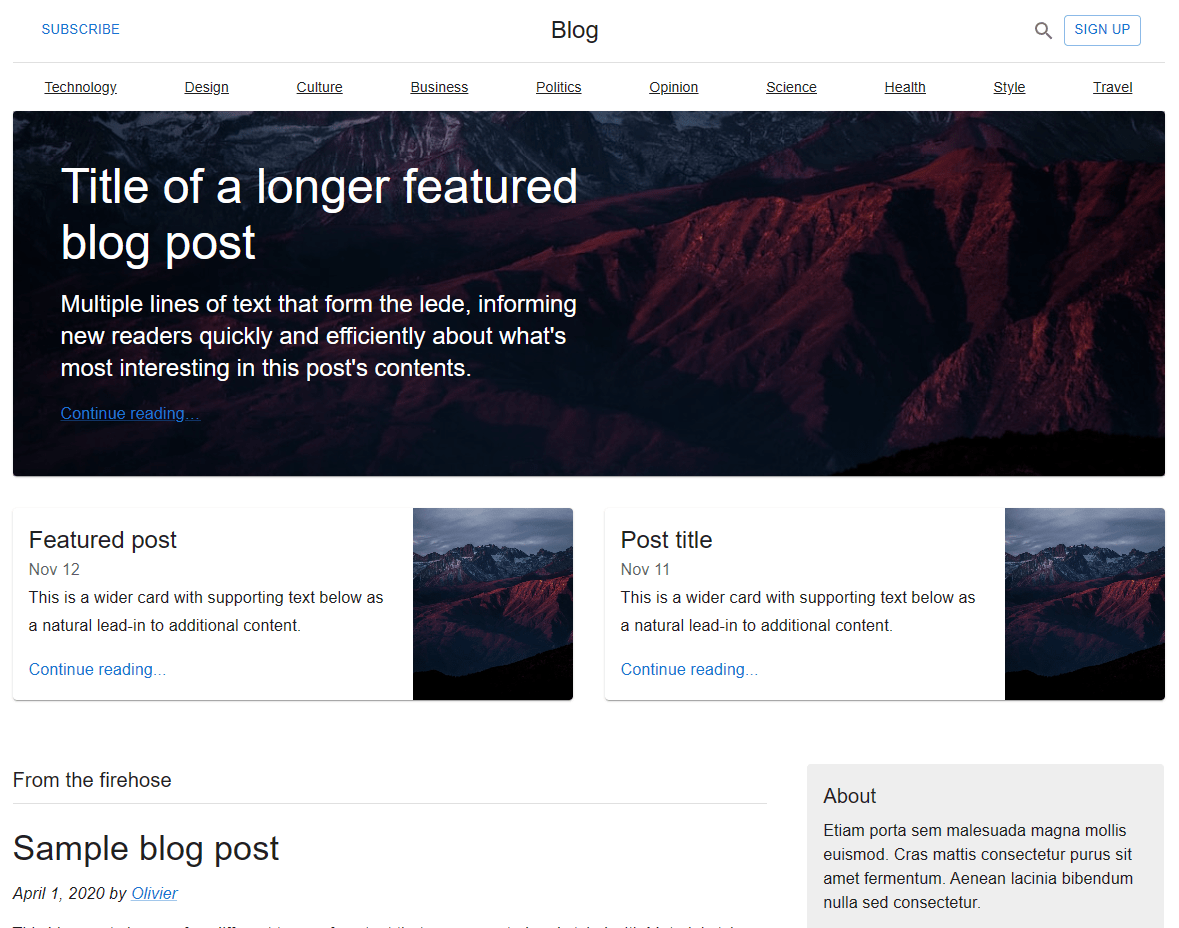
完成品
これにて、ようやく MUI サンプルアプリを自分の AWS 環境で立ち上げることができました!
以降は、AWS Cloud9 でソースコードを更新して AWS CodeCommit にプッシュすることで、Amplify 上の実行環境にデプロイされるのでコードの変更を画面に反映することができます。
まとめ
いかがでしたでしょうか?
MUI サンプルアプリのコードがそのままでは動かない、AWS Amplify 側で設定変更が必要、など面倒なことはありましたが、何とか立ち上げることができました。自分で書き換えたコードが目に見えるようになるので、学習に活用できると思います。
本記事が皆様のお役に立てれば幸いです。