WSL2上にPythonのDevContainerを構築する方法

はじめに
はじめまして。
SHIFT DAAE(ダーエ)テクノロジーグループの千田です。
この記事では、WSL上にPythonのDevContainerを構築する方法をご紹介します。
DevContainerとは
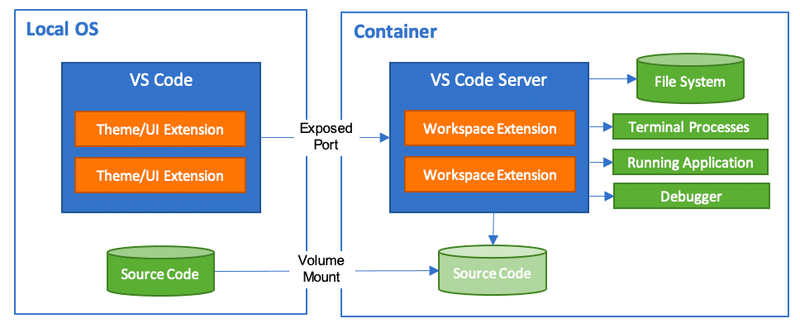
DevContainerとは、Visual Studio Code(VS Code)の拡張機能で、Dockerコンテナー内の開発環境を提供してくれます。 この機能には以下のようなメリットがあります。
Windows, Macなど開発マシンが混在していても、コンテナーを使うので環境が統一できる
ミドルウェアや言語ランタイムバージョンなどのインストールをコンテナー上に行うため、ローカル環境を汚さず、他のプロジェクトにも影響を与えない
定義ファイルやイメージを共有することで、新規メンバーのセットアップ時間を短縮できる
開発環境
Windows 10 22H2
Visual Studio Code (VS Code) 1.85.2
Windows Terminal
WSL 2
Ubuntu 22.04 LTS
Docker Engine on Ubuntu
DockerはUbuntu上にインストールするため、ホスト側にはDockerDesktopをインストールする必要はありません。
DevContainer環境
Python 3.12.1
Poetry
Poetryとは、Pythonでの依存関係管理とパッケージングのためのツールです。
poetry add <package-name>でパッケージを追加すると、pyproject.tomlにパッケージをバージョンとともに追加してくれます。
--group=devオプションを付ければ開発用としてパッケージを追加することもできます。
poetry.lockは自動で生成&更新され、依存関係を追跡するために使用されます。
Node.jsでいうnpmみたいなものなので便利です。
詳細はPoetryの公式サイトをご覧ください。
環境準備
VS Code拡張機能の追加
VS Codeに以下の拡張機能を追加します。
Remote Development拡張はリモートマシンやDockerコンテナー、WSLでの開発を可能にし、Docker拡張はDockerコンテナーのビルド、管理、デバッグを可能にします。
Remote Development

Docker

Windows Terminalのインストール
この記事では、コマンドの実行にWindows Terminalを利用します。Microsoft Storeからインストールしてください。
WSL 2のインストール
WSL2のインストール手順は Microsoftの公式ドキュメントを参考にしています。
1.管理者としてWindows Terminalを起動し、タブ名が「管理者: Windows PowerShell」となっていることを確認します。
2.WSLを有効にします。
dism.exe /online /enable-feature /featurename:Microsoft-Windows-Subsystem-Linux /all /norestart3.仮想マシンの機能を有効にします。
dism.exe /online /enable-feature /featurename:VirtualMachinePlatform /all /norestart4.一度Windowsを再起動します。
5.管理者としてWindows Terminalを起動し、タブ名が「管理者: Windows PowerShell」となっていることを確認します。
6.更新プログラムをダウンロードします。
wsl --update7.WSL 2を既定のバージョンとして設定します。
wsl --set-default-version 28.Ubuntu 22.04 LTSディストリビューションをインストールします。
wsl --install -d Ubuntu-22.049.インストール完了後、Ubuntuのユーザー名とパスワードの入力が求められるので設定します。
9-1 「実行しようとした操作は、参照したオブジェクトの種類ではサポートされていません。」と表示される場合
9-2 Winsockカタログをリセットしてから再度Ubuntuのインストールを行います
netsh winsock reset10.管理者で開いているWindows Terminalを終了します。
DockerをUbuntuにインストール
Dockerのインストール手順は以下の公式ドキュメントを参考にして作成しています。
それではDockerをUbuntuにインストールしていきましょう。
1.Windows Terminalを起動し、「v」からUbuntuのタブを開きます。
2.Dockerのaptリポジトリをセットアップします。
# Add Docker's official GPG key:
sudo apt-get update
sudo apt-get install ca-certificates curl gnupg
sudo install -m 0755 -d /etc/apt/keyrings
curl -fsSL https://download.docker.com/linux/ubuntu/gpg | sudo gpg --dearmor -o /etc/apt/keyrings/docker.gpg
sudo chmod a+r /etc/apt/keyrings/docker.gpg

# Add the repository to Apt sources:
echo \
  "deb [arch=$(dpkg --print-architecture) signed-by=/etc/apt/keyrings/docker.gpg] https://download.docker.com/linux/ubuntu \
  $(. /etc/os-release && echo "$VERSION_CODENAME") stable" | \
  sudo tee /etc/apt/sources.list.d/docker.list > /dev/null
sudo apt-get update3.Dockerのパッケージをインストールします。
sudo apt-get install docker-ce docker-ce-cli containerd.io docker-buildx-plugin docker-compose-plugin4.hello-worldイメージを実行して、インストールが完了したことを確認します。
sudo docker run hello-world以下は実行結果の一例です。
# 実行結果
Hello from Docker!
This message shows that your installation appears to be working correctly.

To generate this message, Docker took the following steps:
1. The Docker client contacted the Docker daemon.
2. The Docker daemon pulled the "hello-world" image from the Docker Hub.
    (amd64)
3. The Docker daemon created a new container from that image which runs the
    executable that produces the output you are currently reading.
4. The Docker daemon streamed that output to the Docker client, which sent it
    to your terminal.

To try something more ambitious, you can run an Ubuntu container with:
$ docker run -it ubuntu bash

Share images, automate workflows, and more with a free Docker ID:
https://hub.docker.com/

For more examples and ideas, visit:
https://docs.docker.com/get-started/5.rootユーザー以外がsudo無しでdockerコマンドを実行できるように設定します。
5-1.dockerグループを作成します。
sudo groupadd docker5-2.現在のユーザーをdockerグループに追加します。
sudo usermod -aG docker $USER5-3.dockerグループの変更を適用します。
newgrp docker5-4.sudoなしでdockerコマンドが実行できることを確認します。
docker run hello-worldDevContainerの構築
1.Windows Terminalを起動し、「v」からUbuntuのタブを開きます。
2.作業用のディレクトリ(例:devcontainer-python)を作成し、移動します。
mkdir devcontainer-python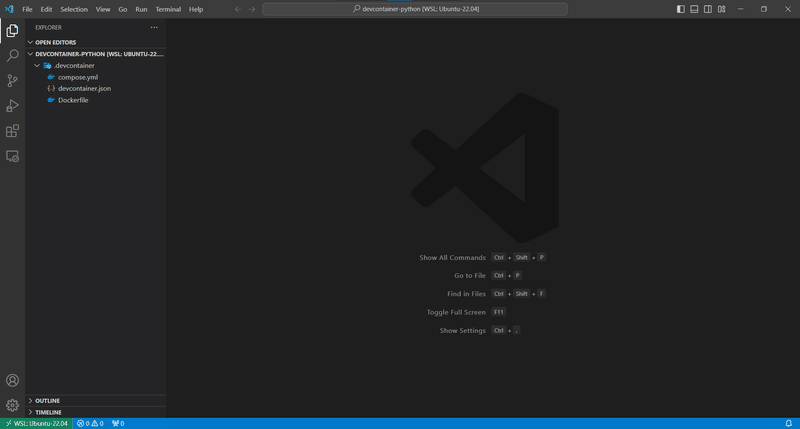
cd devcontaienr-python/3.必要なディレクトリと空ファイルを作成します。
mkdir .devcontainer
touch .devcontainer/compose.yml .devcontainer/Dockerfile .devcontainer/devcontainer.json4.以下のような構成になっていればOKです。
devcontainer-json/
└── .devcontainer/
    ├── Dockerfile
    ├── compose.yml
└── devcontainer.json5.devcontainer-pythonディレクトリで以下のコマンドを実行し、VS Codeを起動します。
code .6.初回起動時、Ubuntuに自動でVS Code Serverがインストールされるため、Ubuntu上のディレクトリをホストのVS Codeから操作できるようになります。
6-1.VS Codeのステータスバー左部に「WSL: Ubuntu-22.04」と表示されていればOK
7.以降の作業はVS Code上で行います。
compose.yml
services:
    app:
        build:
            context: .
            args:
                - USERNAME=${USER}
        command: sleep infinity
        volumes:
            - vscode-extensions:/root/.vscode-server/extensions
            - ../..:/workspaces:cached

volumes:
    vscode-extensions:
build:
context: 同じディレクトリのDockerfileを使ってビルドするため、カレントディレクトリを指定
args: Dockerfileに渡す引数としてホストのユーザー名を指定
command: コンテナーを開発環境として利用するため、タスクを終了しないように設定
volumes:
コンテナーにマウントしたいボリュームを指定
1つ目はVS Code ExtensionのキャッシュをDocker volumeとして指定
2つ目は作業ディレクトリ(devcontainer-python)をbind mountで指定
Dockerfile
FROM python:3.12.1

WORKDIR /work

ARG USERNAME

SHELL [ "/bin/bash", "-c" ]

# 開発で使うライブラリをインストール
RUN apt update && apt install -y \
        iputils-ping \
        iproute2 \
        jq \
        dnsutils \
        sysstat \
        lsof \
        nkf \
        socat \
    # キャッシュの削除
    && apt clean \
    && rm -rf /var/lib/apt/lists/* \
    # ホストユーザーをDevContainer上に作成
    && groupadd ${USERNAME} \
    && useradd -d /home/${USERNAME} -s /bin/bash -g ${USERNAME} -m ${USERNAME} \
    # ソースコードを配置する作業ディレクトリを作成
    && mkdir -m 777 /workspaces

USER ${USERNAME}

# Poetryが作成するPythonの仮想環境をプロジェクトのルートディレクトリに設定
ENV POETRY_VIRTUALENVS_IN_PROJECT=true

# Poetryのインストール
RUN \
    curl -sSL https://install.python-poetry.org | python3 - \
    # PATHを通す
    && echo export PATH="${PATH}:${HOME}/.local/bin" >> ~/.bash_profile \
    && source ~/.bash_profile \
    # TABキーでのコマンド補完を設定
    && poetry completions bash >> ~/.bash_completion
開発で使うライブラリをインストールし、イメージサイズを削減するためにキャッシュの削除を行います。
DevContainerで開発する際のユーザーはホストのユーザーに合わせたいので同じ名前のユーザーを作成しています。
ユーザーIDはdevcontainer.jsonで上書きできるのでここでは指定していません。
devcontainer.json
{
    "name": "${localWorkspaceFolderBasename}", // コンテナー表示名
    "dockerComposeFile": "./compose.yml", // Docker Composeのファイルパス
    "service": "app", // VS Codeがアタッチするコンテナー
    "workspaceFolder": "/workspaces/${localWorkspaceFolderBasename}", // VS Codeがコンテナー起動時に開くディレクトリ
    "remoteUser": "${localEnv:USER}", // VS Codeがコンテナーにアタッチする際に使用するユーザー
    "updateRemoteUserUID": true, // ユーザーのUID/GIDをホストのユーザーと同期
    "postCreateCommand": "poetry install", // コンテナー作成/再作成後、workspaceFolderで初回のみ実行されるコマンド
    "customizations": {
        "vscode": {
            "extensions": [ // 自動でインストールされるVS Codeの拡張機能
                // UI
                "oderwat.indent-rainbow",
                // autocompletes
                "VisualStudioExptTeam.vscodeintellicode",
                "christian-kohler.path-intellisense",
                // formatting and linting
                "streetsidesoftware.code-spell-checker",
                "EditorConfig.EditorConfig",
                "esbenp.prettier-vscode",
                "tamasfe.even-better-toml",
                // Japanese
                "sgryjp.japanese-word-handler",
                "ICS.japanese-proofreading",
                // Git
                "codezombiech.gitignore",
                "mhutchie.git-graph",
                "eamodio.gitlens",
                // Docker
                "ms-azuretools.vscode-docker",
                // Python
                "ms-python.python",
                "ms-python.vscode-pylance",
                "ms-python.black-formatter",
                "ms-python.isort",
                "KevinRose.vsc-python-indent",
                "njpwerner.autodocstring",
                "LittleFoxTeam.vscode-python-test-adapter"
            ],
            "settings": { // VS Codeの設定
                "editor.defaultFormatter": "esbenp.prettier-vscode",
                "editor.formatOnSave": true,
                "editor.guides.bracketPairs": true,
                "editor.renderWhitespace": "all",
                // Python
                "python.languageServer": "Pylance",
                "[python]": {
                    "editor.defaultFormatter": "ms-python.black-formatter",
                    "editor.formatOnSave": true,
                    "editor.codeActionsOnSave": {
                        "source.organizeImports": true
                    }
                },
                "isort.args": ["profile", "black"]
            }
        }
    }
}
// Python以降の部分がPython向けの拡張機能と設定です。
言語サーバーをPylanceに設定し、blackとisortのフォーマッターを有効にするための設定をしてあります。
それ以外の拡張機能や設定も開発をやりやすくするためのものですが、詳細は省きます。適宜カスタマイズしてください。
DevContainerの利用方法
起動方法
VS Codeでプロジェクトのディレクトリを開きます。
コマンドパレット(Ctrl + Shift + P)を起動します。
「Dev Containers: Reopen in Container」を選択することでDevContainerが起動します。
※VS Codeを起動した際、右下に表示される「Reopen in Container」でも起動できます。
変更の適用
.devcontainerディレクトリ配下のファイルを変更した際は、イメージのリビルドとコンテナーの再作成が必要になります。
VS Codeでコマンドパレット(Ctrl + Shift + P)を起動します。
「Dev Containers: Rebuild and Reopen in Container」を選択することでDevContainerを再作成して起動します。
補足
Poetryの初期設定
PoetryでPythonの依存関係を管理するには初期設定が必要です。
VS CodeでDevContainerを起動し、ターミナルで初期化コマンドを実行してください。
poetry init対話的に入力が求められるので、プロジェクトに応じて入力してください。
完了すると、pyproject.tomlとpoetry.lockが作成されます。
Poetryで追加したパッケージが認識されない場合
VS Codeはデフォルトでプロジェクトのルートにある仮想環境(.venv)を認識しますが、VS Code起動中に仮想環境が作成された際などは手動で設定する必要があります。
VS CodeでDevContainerを起動し、コマンドパレット(Ctrl + Shift + P)を起動します。
「Python: インタープリターを選択」を選択します。
「Python 3.12.x ('.venv': poetry) ./.venv/bin/python」を選択します。
一度設定すれば、次回以降は自動でインタープリターが選択された状態になります。
おわりに
以上、DevContainerの環境構築について説明しました。
これで環境構築を気にすることなく、開発に集中できます。
また、定義ファイルを共有することで、新たな開発メンバーも迅速に開発を開始することが可能となります。
DevContainerをぜひ試してみてください。
最後まで読んでいただきありがとうございました。
\もっと身近にもっとリアルに!DAAE公式Twitter/
執筆者プロフィール: Chida Akihiro
SHIFT DAAEグループ所属のエンジニアです。
お問合せはお気軽に
SHIFTについて(コーポレートサイト)
https://www.shiftinc.jp/
SHIFTのサービスについて(サービスサイト)
https://service.shiftinc.jp/
SHIFTの導入事例
https://service.shiftinc.jp/case/
お役立ち資料はこちら
https://service.shiftinc.jp/resources/
SHIFTの採用情報はこちら
https://recruit.shiftinc.jp/career/
PHOTO:UnsplashのChris Ried