さくらのクラウドでTerraformを使ってみる
目次
概要
Terraform for さくらのクラウド(v2)を使ってシンプルな構成から始めて、複数のリージョンを使った冗長構成を作っていきます。
大まかには以下の順番で作成します。
- 共有セグメントにつながったサーバを1台
- スイッチにつながったサーバを1台
- 共有セグメントにつながったサーバを複数台
- グローバルとローカルにつながったサーバとローカルにつながったサーバを複数台
- 複数のリージョンを使った冗長構成 + VPCルータ
前提
- さくらのクラウドのAPIキーは”作成・削除”の権限で作成済み
- あとで必要になるのでアクセストークンとアクセストークンシークレットは控えておいてください
- APIキーの作成がお済みでない方は → APIキーの作成方法
- この作業を実行する環境は "Ubuntu 20.04.4 LTS" です
- 構成ファイルは一つにまとめます
- Terraform for さくらのクラウド(v2)の設定リファレンスは ここ
- この記事では、サーバやスイッチが作成されたかどうかはコントロールパネルから確認します
準備
Terraformのインストール
- まず、
sudo apt install gnupg2 software-properties-commonを実行します。 - 公式のページに載っている手順を実行します。
今回はパッケージマネージャーからインストールしました。
(gpgキー登録→リポジトリ追加→aptでinstall) - インストールできたか確認します。バージョンが表示されればOKです。
$ terraform -v
Terraform v1.2.1
on linux_amd64
Terraform Provider for SakuraCloudをインストールする
今回はバージョン2.16.2を使います。
$ cat <<EOF > terraform_me.tf
terraform {
  required_providers {
    sakuracloud = {
      source  = "sacloud/sakuracloud"
      version = "2.16.2"
    }
  }
}
EOF
terraform initを実行して、以下のような出力がされればOKです。
$ terraform init
Initializing the backend...

Initializing provider plugins...
- Finding sacloud/sakuracloud versions matching "2.16.2"...
- Installing sacloud/sakuracloud v2.16.2...
- Installed sacloud/sakuracloud v2.16.2 (self-signed, key ID 96CEB4B93D86849D)

(中略)

Terraform has been successfully initialized!

You may now begin working with Terraform. Try running "terraform plan" to see
any changes that are required for your infrastructure. All Terraform commands
should now work.

(後略)
これで準備はおしまいです。
共有セグメントにつながったサーバを1台作る
構成ファイルを書く
以下の内容で構成ファイルを作成します。準備の項で作成した *terraform_me.tf*を修正して以下のようにします。
terraform {
  required_providers {
    sakuracloud = {
      source  = "sacloud/sakuracloud"
      version = "2.16.2"
    }
  }
}
provider "sakuracloud" {
  # profile = "default"
  # usacloudがインストールされていれば、上記のようにするとusacloudで使っているtokenや他の設定値を流用できます。
  # その場合は下記のtokenやsecretは書かなくてもOKです。
  token = "準備の項で控えておいたアクセストークンを記載"
  secret = "準備の項で控えておいたアクセストークンシークレットを記載"
  zone = "is1b" # resourceやdataの項でzoneの指定がない場合はis1bをデフォルトとする設定。省略可。
}

# 設定するパスワードの変数を定義
variable "password" { default = "himitsunoString" }

# ディスクにインストールするイメージを指定。他には"centos8stream"や"ubuntu"などが指定できます。
# 設定できるos_typeの詳細: https://docs.usacloud.jp/terraform/d/archive/
data "sakuracloud_archive" "ubuntu" {
  os_type = "ubuntu2004"
}

# 作成するディスクを定義
resource "sakuracloud_disk" "example1_disk" {
  name              = "example1_disk"
  size              = 20
  plan              = "ssd"
  connector         = "virtio"
  source_archive_id = data.sakuracloud_archive.ubuntu.id
}

# 作成するサーバを定義
resource "sakuracloud_server" "example1_srv" {
  name        = "example1_srv"
  disks       = [sakuracloud_disk.example1_disk.id]
  core        = 1
  memory      = 1
  description = "descriptionIshere"
  tags        = ["tag_tag", "tag_testme"]

  # サーバのNICの接続先の定義。sharedだと共有セグメント(インターネット)に接続される。
  network_interface {
    upstream = "shared"
  }
  disk_edit_parameter {
    hostname = "example"
    password = var.password
    disable_pw_auth = true
  }
}
実行する
以下のコマンドを実行してサーバを作ります。
# 構成ファイルの記述が有効であるかを確認します
terraform validate
# 構成ファイルを適用した際の変更点(インスタンスなどの増減やパラメータの変更など)を表示します
terraform plan
# planで表示された変更点でインフラ(インスタンスなど)の作成/更新を行います
terraform apply
terraform apply 実行時に確認が入るので実行する場合はyesと入力します。
なお、terraform apply --auto-approveとすると確認が入らなくなります。
確認する
コントロールパネルにログインして様子を見ます。
ディスクが作成されている様子。 出来てる!うれしいいいいい!
マップ機能で見てみます。 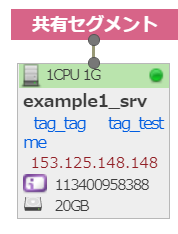 キタ━━━━(゚∀゚)━━━━!!
コンソール機能から見てみるとホスト名が設定されていることが分かります。  やった!
やった!
なお、構成ファイルのmemoryの数字を2などにしてもう一度実行すると、サーバのスペックが変わる事が確認できます。
出来上がったことを確認したら、作ったリソースを以下のコマンドを実行して削除します。
terraform destroyスイッチにつながったサーバを1台作る
引き続き、スイッチにつながったサーバを1台作る構成ファイルを作ります。
構成ファイルを書く
以下の内容で terraform_me.tf を修正します。
terraform {
  required_providers {
    sakuracloud = {
      source  = "sacloud/sakuracloud"
      version = "2.16.2"
    }
  }
}
provider "sakuracloud" {
  # profile = "default"
  # usacloudがインストールされていれば、上記のようにするとusacloudで使っているtokenや他の設定値を流用できます。
  # そうした場合は下記のtokenやsecretは書かなくてもOKです。
  token = "準備の項で控えておいたアクセストークンを記載"
  secret = "準備の項で控えておいたアクセストークンシークレットを記載"
  zone = "is1b" # resourceやdataの項でzoneの指定がない場合はis1bをデフォルトとする設定。省略可。
}

variable "password" { default = "himitsustring" }

data "sakuracloud_archive" "ubuntu" {
  os_type = "ubuntu2004"
}

resource "sakuracloud_disk" "example1_disk" {
  name              = "example1_disk"
  size              = 20
  plan              = "ssd"
  connector         = "virtio"
  source_archive_id = data.sakuracloud_archive.ubuntu.id
}

# スイッチを作成する定義
resource "sakuracloud_switch" "example1_sw" {
  name = "exp_sw"
}

# 作成するサーバの定義
resource "sakuracloud_server" "example1_srv" {
  name        = "example1_srv"
  disks       = [sakuracloud_disk.example1_disk.id]
  core        = 1
  memory      = 1
  description = "descriptionIshere"
  tags        = ["tag_tag", "tag_testme"]
  # サーバに作成するNICの定義
  network_interface {
    upstream        = sakuracloud_switch.example1_sw.id # 接続先の定義。terraformで作成したスイッチを指定しています
    user_ip_address = "192.168.99.1" # コントロールパネル上に表示するIPアドレスを定義

  }
  # ホスト名などを定義。コントロールパネルからサーバを作成する場合でいうとディスクの修正に相当します
  disk_edit_parameter {
    hostname   = "example"
    password   = var.password
    ip_address = "192.168.99.1"
    netmask    = 24
  }
}
実行する
terraform validate
terraform plan
terraform apply
確認する
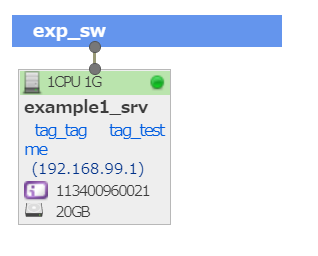
キタ━━━━(゚∀゚)━━━━!! 出来てる!うれしいいい!!!
出来上がったことを確認したら、作ったリソースを以下のコマンドを実行して削除します。
terraform destroy共用セグメントにつながったサーバを複数台作る
構成ファイルを書く
以下の内容でterraform_me.tfを修正します。
terraform {
  required_providers {
    sakuracloud = {
      source  = "sacloud/sakuracloud"
      version = "2.16.2"
    }
  }
}
provider "sakuracloud" {
  # profile = "default"
  # usacloudがインストールされていれば上記のようにするとusacloudで使っているtokenや他の設定値を流用できます。
  # そうした場合は下記のtoken や secret は書かなくてもOKです。
  token = "準備の項で控えておいたアクセストークンを記載"
  secret = "準備の項で控えていたアクセストークンシークレットを記載"
  zone = "is1b" # resourceやdataの項でzoneの指定がない場合はis1bをデフォルトとする設定。省略可。
}

variable "password" {
  default = "himitsuhimitsu"
}

variable "create_count" {
  default = 3
}

data "sakuracloud_archive" "ubuntu" {
  os_type = "ubuntu2004"
}

resource "sakuracloud_disk" "example_disk" {
  count             = var.create_count
  name              = format("example1_disk_%[1]d", count.index + 1)
  size              = 20
  plan              = "ssd"
  connector         = "virtio"
  source_archive_id = data.sakuracloud_archive.ubuntu.id
}

# 作成するサーバの定義
resource "sakuracloud_server" "example_srv" {
  count       = var.create_count # 何台作成するかを定義
  name        = format("example_srv_%[1]d", count.index + 1) #同じ名前になると見分けが付かなくなるでformatとindexを使って動的に変更する。
  disks       = [element(sakuracloud_disk.example_disk.*.id, count.index)] # 作成したディスクを順番に作成したサーバに割り当てている
  core        = 1
  memory      = 1
  description = "this is description"
  tags        = ["tag1", "tag2"]

  network_interface {
    upstream = "shared"
  }

  disk_edit_parameter {
    hostname = format("example-srv-%[1]d", count.index + 1) #同じ名前になると見分けが付かなくなるでformatとindexを使って動的に変更する。
    password = var.password
  }
}countについては、terraformの公式ドキュメントのここに載っていて、elementについてはここに載っています。
実行する
以下のコマンドを実行してサーバを作ります。
terraform validate
terraform plan
terraform apply
terraform apply 実行時に確認が入るので実行する場合はyesと入力します。
なお、terraform apply --auto-approve とすると確認が入らなくなります。
確認する
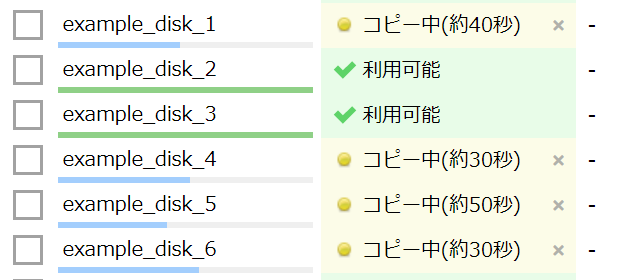
コントロールパネルにログインして様子を見てみます。
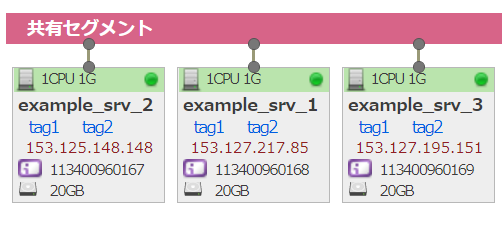
出来ている!うれしいいいいい!!
ホスト名も設定されています。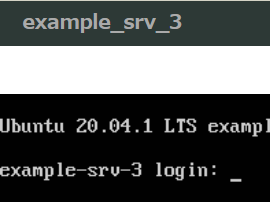
出来上がったことを確認したら、作ったリソースを以下のコマンドを実行して削除します。
terraform destroyグローバルとローカルにつながったサーバとローカルにつながったサーバを複数台作る
構成ファイルを書く
以下の内容でterraform_me.tfを修正します。
terraform {
  required_providers {
    sakuracloud = {
      source  = "sacloud/sakuracloud"
      version = "2.16.2"
    }
  }
}
provider "sakuracloud" {
  # profile = "default"
  # usacloudがインストールされていれば、上記のようにするとusacloudで使っているtokenや他の設定値を流用できます。
  # そうした場合は下記のtokenやsecretは書かなくてもOKです。
  token = "準備の項で控えておいたアクセストークンを記載"
  secret = "準備の項で控えていたアクセストークンシークレットを記載"
  zone = "is1b" # resourceやdataの項でzoneの指定がない場合はis1bをデフォルトとする設定。省略可。
}

variable "password" {
  default = "himitsuhimitsu"
}

# サーバは2つのresourceで3台づつ作るので3を指定
variable "count_of_create_srv" {
  default = 3
}

# ディスクは一つのresourceで6台作るので6を指定
variable "count_of_create_disk" {
  default = 6
}

data "sakuracloud_archive" "ubuntu" {
  os_type = "ubuntu2004"
}

resource "sakuracloud_switch" "example1_sw" {
  name = "exp_sw"
}

resource "sakuracloud_disk" "example_disk" {
  count             = var.count_of_create_disk
  name              = format("example_disk_%[1]d", count.index + 1)
  size              = 20
  plan              = "ssd"
  connector         = "virtio"
  source_archive_id = data.sakuracloud_archive.ubuntu.id
}

resource "sakuracloud_server" "example_global_srv" {
  count       = var.count_of_create_srv
  name        = format("example_global_srv_%[1]d", count.index + 1)
  disks       = [element(sakuracloud_disk.example_disk.*.id, count.index)]
  core        = 1
  memory      = 1
  description = "this is description"
  tags        = ["globalAndLocal"]

  network_interface {
    upstream = "shared"
  }

  network_interface {
    upstream        = resource.sakuracloud_switch.example1_sw.id
    user_ip_address = format("192.168.99.%[1]d", count.index + 1)
  }

  disk_edit_parameter {
    hostname = format("example-global-srv-%[1]d", count.index + 1)
    password = var.password
  }
}

resource "sakuracloud_server" "example_local_srv" {
  count       = var.count_of_create_srv
  name        = format("example_local_srv_%[1]d", count.index + 1)
  disks       = [element(sakuracloud_disk.example_disk.*.id, count.index + 3)]
  # indexが+3になっているのは、0~2まではresource.sakuracloud_server.example_global_srvに割り当てているため
  core        = 1
  memory      = 1
  description = "this is description"
  tags        = ["local_only"]

  network_interface {
    upstream        = resource.sakuracloud_switch.example1_sw.id
    user_ip_address = format("192.168.99.1%[1]d", count.index + 1)
  }

  disk_edit_parameter {
    hostname    = format("example-local-srv-%[1]d", count.index + 1)
    password    = var.password
    enable_dhcp = false
    ip_address  = format("192.168.99.1%[1]d", count.index + 1)
    netmask     = 24
    gateway     = "192.168.1.254"
  }
}
実行する
以下のコマンドを実行してサーバを作ります。
terraform validate
terraform plan
terraform apply
確認する
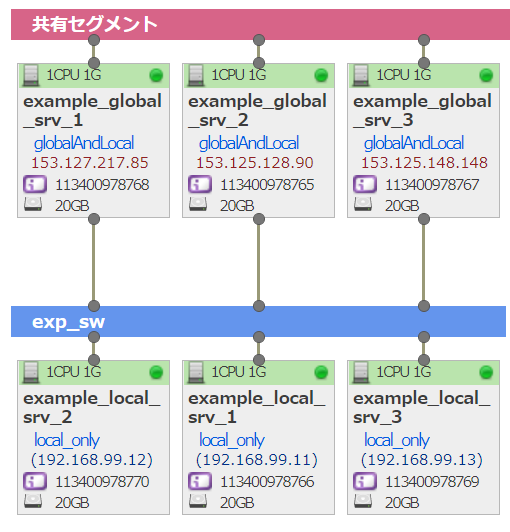
コントロールパネルにログインして様子を見てみます。
ディスクが出来ている!やったー。うひょー!
マップでの構成も想定していたものになっています。
出来上がったことを確認したら作ったリソースを以下のコマンドを実行して削除します。
terraform destroy複数のリージョンを使った冗長構成 + VPCルータ
構成ファイルを書く
以下の内容で terraform_me.tf を修正します。なお、terraform_me.tf におけるzoneの設定値のうち、tk1aは東京第1ゾーン、is1bは石狩第2ゾーンです。ゾーンやリージョンの概念については、さくらのクラウドのマニュアルもご参照ください。
terraform {
  required_providers {
    sakuracloud = {
      source  = "sacloud/sakuracloud"
      version = "2.16.2"
    }
  }
}
provider "sakuracloud" {
  # profile = "default"
  # usacloudがインストールされていれば、上記のようにするとusacloudで使っているtokenや他の設定値を流用できます。
  # そうした場合は下記のtokenやsecretは書かなくてもOKです。
  token = "準備の項で控えておいたアクセストークンを記載"
  secret = "準備の項で控えておいたアクセストークンシークレットを記載"
  zone = "is1b" # resourceやdataの項でzoneの指定がない場合はis1bをデフォルトとする設定。省略可。
}

# tk1aで使うOSイメージの指定
data "sakuracloud_archive" "ubuntu_tk1a" {
  os_type = "ubuntu2004"
  zone    = "tk1a"
}

# is1bで使うOSイメージの指定
data "sakuracloud_archive" "ubuntu_is1b" {
  os_type = "ubuntu2004"
  zone    = "is1b"
}

# パスワードを定義
variable "password" {
  default = "himitsunostring"
}

# ブリッジ接続
resource "sakuracloud_bridge" "example_bridge" {
  name        = "example_bridge"
  description = "bridge_description"
}

# tk1aのスイッチ
resource "sakuracloud_switch" "example_tk1a_sw" {
  name        = "example_tk1a_sw"
  description = "this is sw"
  bridge_id   = sakuracloud_bridge.example_bridge.id # ブリッジに接続する定義。example_bridgeを指定している。
  zone        = "tk1a"
}

# is1bのスイッチ
resource "sakuracloud_switch" "example_is1b_sw" {
  name        = "example_is1b_sw"
  description = "this is sw"
  bridge_id   = sakuracloud_bridge.example_bridge.id # ブリッジに接続する定義。example_bridgeを指定している。
  zone        = "is1b"
}

# tk1aのローカル接続のサーバのディスク
resource "sakuracloud_disk" "example_disk_tk1a" {
  name              = "example_disk_tk1a"
  size              = 20
  plan              = "ssd"
  connector         = "virtio"
  zone              = "tk1a"
  source_archive_id = data.sakuracloud_archive.ubuntu_tk1a.id
}

# tk1aのローカル接続のサーバ
resource "sakuracloud_server" "example_srv_local_tk1a" {
  name        = "example_srv1"
  disks       = [sakuracloud_disk.example_disk_tk1a.id]
  core        = 1
  memory      = 1
  description = "this is description"
  tags        = ["tag1", "tag2"]
  zone        = "tk1a"

  network_interface {
    upstream        = resource.sakuracloud_switch.example_tk1a_sw.id
    user_ip_address = "192.168.99.11"
  }
  disk_edit_parameter {
    hostname   = "example-srv1"
    password   = var.password
    ip_address = "192.168.99.11"
    netmask    = 24
    gateway    = "192.168.99.254"
  }
}

# is1bのローカル接続のサーバのディスク
resource "sakuracloud_disk" "example_disk_is1b" {
  name              = "example_disk_is1b"
  size              = 20
  plan              = "ssd"
  connector         = "virtio"
  zone              = "is1b"
  source_archive_id = data.sakuracloud_archive.ubuntu_is1b.id
}

# is1bのローカル接続のサーバ
resource "sakuracloud_server" "example_srv_local_is1b" {
  name        = "example_srv2"
  disks       = [sakuracloud_disk.example_disk_is1b.id]
  core        = 1
  memory      = 1
  description = "this is description"
  tags        = ["tag1", "tag2"]
  zone        = "is1b"

  network_interface {
    upstream        = resource.sakuracloud_switch.example_is1b_sw.id
    user_ip_address = "192.168.99.12"
  }
  disk_edit_parameter {
    hostname   = "example-srv2"
    password   = var.password
    ip_address = "192.168.99.12"
    netmask    = 24
    gateway    = "192.168.99.254"
  }
}

# globalに接続されているtk1aのサーバのディスク
resource "sakuracloud_disk" "example_disk_global_tk1a" {
  name              = "example_disk_global_tk1a"
  size              = 20
  plan              = "ssd"
  connector         = "virtio"
  zone              = "tk1a"
  source_archive_id = data.sakuracloud_archive.ubuntu_tk1a.id
}

# globalに接続されているtk1aのサーバ
resource "sakuracloud_server" "example_srv_global_tk1a" {
  name        = "example_srv3"
  disks       = [sakuracloud_disk.example_disk_global_tk1a.id]
  core        = 1
  memory      = 1
  tags        = ["global"]
  description = "共有セグメントに接続されているサーバ"
  zone        = "tk1a"

  network_interface {
    upstream = "shared"
  }

  network_interface {
    upstream        = resource.sakuracloud_switch.example_tk1a_sw.id
    user_ip_address = "192.168.99.13"
  }
  disk_edit_parameter {
    hostname = "example-srv3"
    password = var.password
  }
}

# globalに接続されているis1bのサーバのディスク
resource "sakuracloud_disk" "example_disk_global_is1b" {
  name              = "example_disk_global_is1b"
  size              = 20
  plan              = "ssd"
  connector         = "virtio"
  zone              = "is1b"
  source_archive_id = data.sakuracloud_archive.ubuntu_is1b.id
}

# globalに接続されているis1bのサーバ
resource "sakuracloud_server" "example_srv_global_is1b" {
  name        = "example_srv4"
  disks       = [sakuracloud_disk.example_disk_global_is1b.id]
  core        = 1
  memory      = 1
  tags        = ["global"]
  description = "共有セグメントに接続されているサーバ"
  zone        = "is1b"

  network_interface {
    upstream = "shared"
  }

  network_interface {
    upstream        = resource.sakuracloud_switch.example_is1b_sw.id
    user_ip_address = "192.168.99.14"
  }
  disk_edit_parameter {
    hostname = "example-srv4"
    password = var.password
  }
}

# tk1aに作成したサーバの情報を検索して取得
# GSLBに登録するために使う
data "sakuracloud_server" "search_a" {
  depends_on = [
    sakuracloud_server.example_srv_global_tk1a,
  ]
  filter {
    names = ["example_srv3"]
  }
  zone = "tk1a"
}

# is1bに作成したサーバの情報を検索して取得
# GSLBに登録するために使う
data "sakuracloud_server" "search_b" {
  depends_on = [
    sakuracloud_server.example_srv_global_is1b
  ]
  filter {
    names = ["example_srv4"]
  }
  zone = "is1b"
}

# GSLB
resource "sakuracloud_gslb" "gslbconf" {
  depends_on = [
    data.sakuracloud_server.search_a,
    data.sakuracloud_server.search_b
  ]
  name = "gslb"
  health_check {
    protocol = "ping"
  }
  server {
    ip_address = data.sakuracloud_server.search_a.ip_address # tk1aに作成したサーバのグローバルIPを設定
    weight     = 1
    enabled    = true
  }
  server {
    ip_address = data.sakuracloud_server.search_b.ip_address # is1bに作成したサーバのグローバルIPを設定
    weight     = 1
    enabled    = true
  }
  description = "this is gslb"
  tags        = ["gslb"]
}

# VPCRouter
resource "sakuracloud_vpc_router" "vpcrouter" {
  name = "example-vpcRouter"
  private_network_interface {
    index        = 1 # VPCrouterにはNICが7つあるのでその何番目を使うかを定義
    switch_id    = resource.sakuracloud_switch.example_is1b_sw.id # 接続するスイッチを定義
    ip_addresses = ["192.168.99.254"]
    netmask      = 24
  }
  l2tp {
    pre_shared_secret = "jizenkyouyuukagiisrequired" # 事前共有鍵
    range_start       = "192.168.99.100" # 配布するIPアドレス範囲の最初
    range_stop        = "192.168.99.200" # 配布するIPアドレス範囲の最後
  }
  user {
    name = "l2tpme"
    password = "superhimitsustring"
  }
  zone = "is1b"
}
GSLBやVPCルータの設定の詳細については以下をご覧ください。
また、設定リファレンスページではWebのUIでガイドに沿って構成ファイルを作ることも出来ます。お試しください。
実行する
以下のコマンドを実行してサーバを作ります。
terraform validate
terraform plan
terraform apply
確認する
コントロールパネルにログインして様子を見てみます。

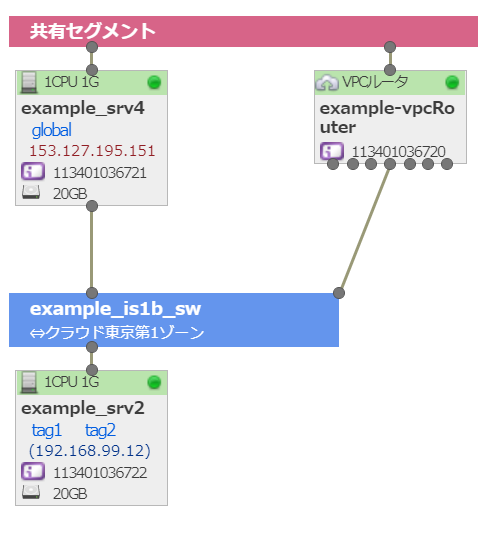
キタ━━━(゚∀゚)━( ゚∀)━( ゚)━( )━( )━(゚ )━(∀゚ )━(゚∀゚)━━━!!
上段がtk1a(東京第1ゾーン)のマップ、下段がis1b(石狩第2ゾーン)のマップです。
出来上がったことを確認したら、作ったリソースを以下のコマンドを実行して削除します。
terraform destroyまとめ
さくらのクラウドでTerraformを始める際の一助になれば幸いです。
今回は省きましたが、パケットフィルターの設定や公開鍵の登録などもしゅしゅっと出来ます。リファレンスをご覧いただきながらお試しください。
おわり。
修正履歴
2022-06-15
providerのインストールの部分でgithubからzipをダウンロードして展開する内容が記載されていましたが、
不要な作業であったため削除しました。