

※この記事はLuup Advent Calendar 2023の 17 日目の記事です。
IoT チーム業務委託エンジニアの山口です。
電子ペーパーは表示の保持に電力を必要としない、とても省電力な表示デバイスです。発色の鮮やかさやリフレッシュレートは液晶ディスプレイに劣るものの、バックライトを使わない反射型表示で目に優しく、紙のように広い視野角を持つなど、優れた視認性が特徴です。
本記事では電子ペーパーを使用したデジタルアートフレームの製作事例を紹介します。
外観
“デジタルアートフレーム”というとやや大仰ですが、これは単に電子ペーパーに ESP32 をつなげて額に収めたものです。毎日午前 0 時に Wi-Fi 接続で画像データをダウンロードして画面を更新し、内蔵の Li-Po バッテリーで約 1 年間動作します。

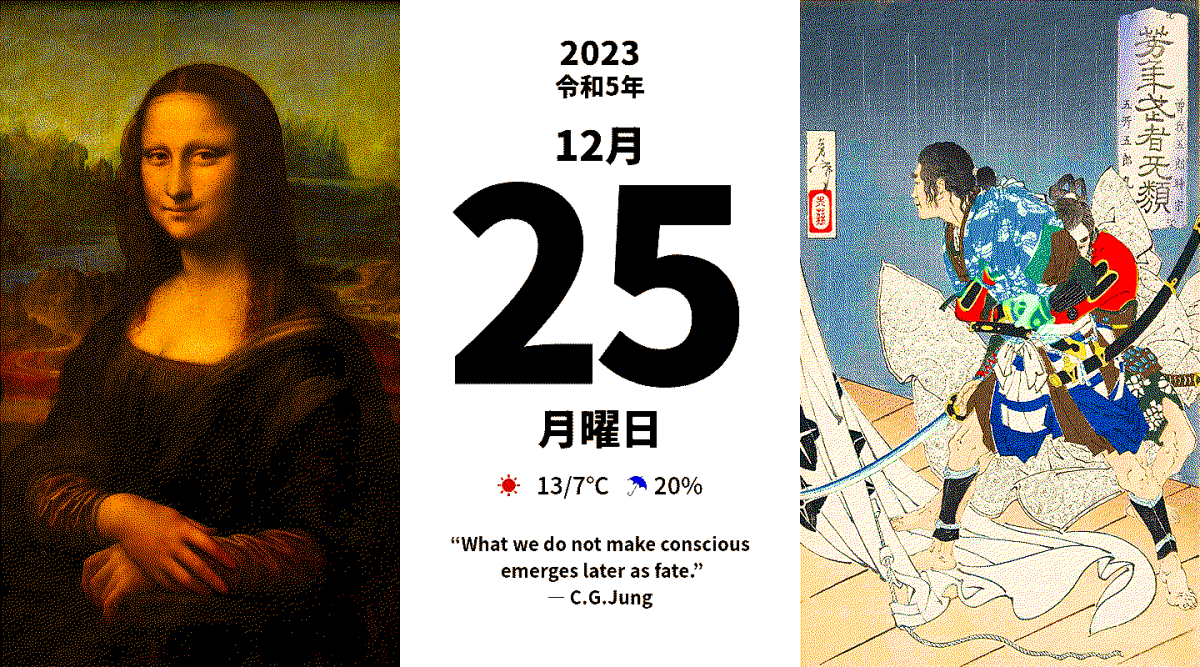
7 色ディザリングによる疑似階調表示。再生紙のカラー印刷のような色調。

色味が穏やかなので、浮世絵の雰囲気に合いそうです。
(歌川国貞「豊国揮毫奇術競 賊首児雷也」)
ハードウェア
Waveshare 7.3inch e-Paper HAT (F)
800×480 ピクセル 7 色表示に対応した 7.3 インチの電子ペーパーモジュールです。
付属基板に SPI 通信用の 8 ピンコネクタと、RasPi 接続用の 40 ピンコネクタが付いています。
画面更新には 30 秒ほどかかります。
Seeeduino XIAO ESP32C3

ESP32-C3 が乗った超小型 IoT マイコンボードです。Wi-Fi や Bluetooth が使えて、ディープスリープ時の消費電流が 44μA なので、省電力な IoT デバイス開発に適しています。チャージコントロール IC を搭載し、USB-C コネクタ経由で Li-Po バッテリーの充電も可能です。
配線
裏側の様子。ケースカバーや Wi-Fi 用アンテナは外しています。
8 ピン PH2.0 コネクタケーブルは自作したもの。
電子ペーパーモジュールの HAT 基板の 8 ピンコネクタと、XIAO ESP32C3 を次の図のように接続します。
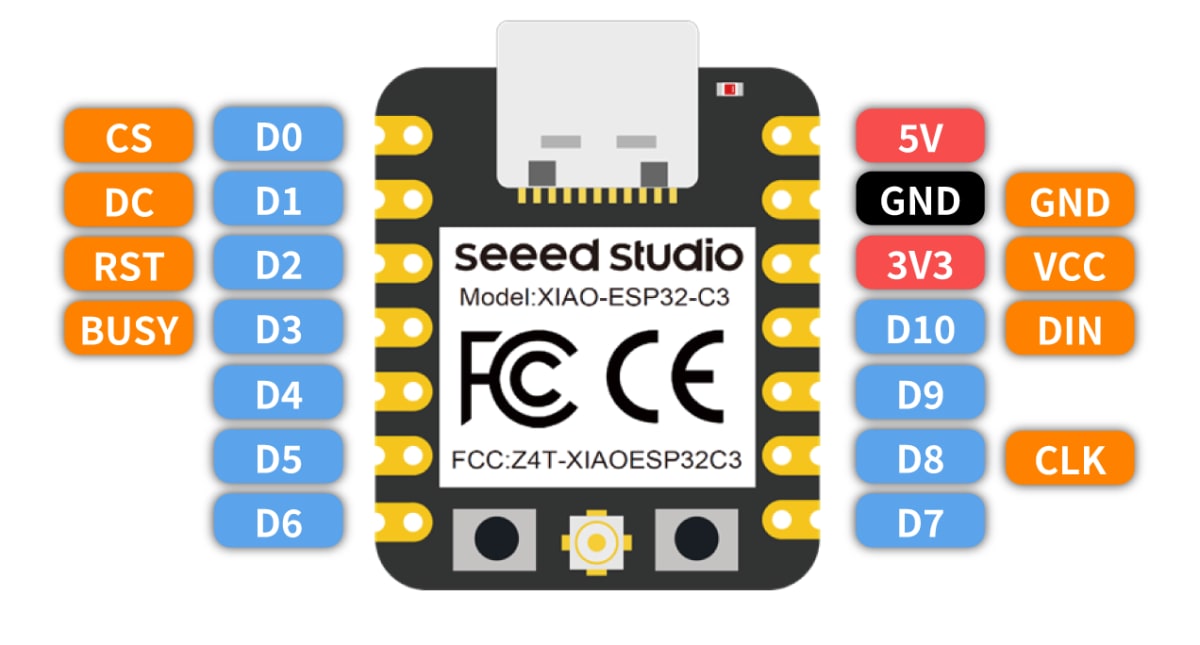
8 ピンコネクタと XIAO ESP32C3 の接続
Li-Po バッテリー接続用のコネクタワイヤを XIAO ESP32C3 の裏面のBAT+,BAT-パッドにはんだ付けします。
ソフトウェア
HTTP で配信する画像データは、800 x 480 の元画像に減色処理を行い、さらに SPI 送信用の形式に変換して作成します。変換ツールは Waveshare 社のサイトで配布されていますが、今回はコンテンツを動的生成できるように、自前で実装してサーバーに組み込みました。
ディザリングによる減色処理
Floyd-Steinberg アルゴリズムは誤差拡散法の一種で、各ピクセルを減色する際に誤差を近傍に拡散させることで中間調を表現します。
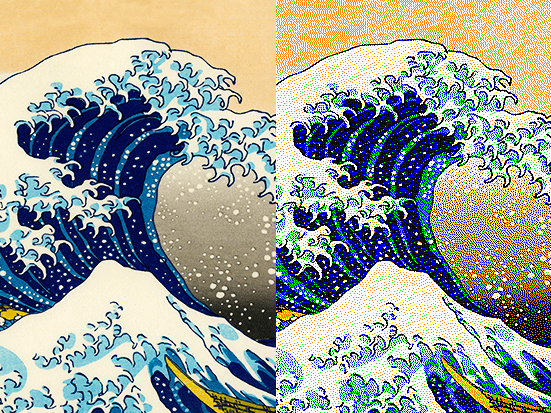
(左)元画像 (右)ディザリング処理後
サンプルコード
import sharp from "sharp"
import * as math from "mathjs"

type RGB = [number, number, number]

// E-Paperのカラーパレット
const PALETTE: RGB[] = [
  [0, 0, 0],
  [255, 255, 255],
  [0, 255, 0],
  [0, 0, 255],
  [255, 0, 0],
  [255, 255, 0],
  [255, 128, 0],
]

// パレットカラー近似
const nearestPaletteColor = (color: RGB, palette: RGB[]): RGB =>
  palette.reduce(
    (prev, curr) => {
      const d = math.number(math.norm(math.subtract(color, curr)))
      return d < prev.d ? { c: curr, d } : prev
    },
    { c: [0, 0, 0] as RGB, d: Number.MAX_SAFE_INTEGER },
  ).c

// 誤差拡散
const diffuseError = (
  e: RGB,
  x: number,
  currLine: number[],
  nextLine: number[],
  info: sharp.OutputInfo,
  ratio = 1.0,
) => {
  const addRGB = (targetLine: number[], i: number, r: number) => {
    const offset = i * info.channels
    const p0 = targetLine.slice(offset, offset + 3) as RGB
    const p1 = math.add(p0, math.multiply(e, r)) as RGB
    p1.forEach((v, j) => {
      targetLine[offset + j] = v
    })
  }
  if (x < info.width - 1) {
    addRGB(currLine, x + 1, (7 * ratio) / 16) // 右
    addRGB(nextLine, x + 1, (1 * ratio) / 16) // 右下
  }
  if (x > 0) {
    addRGB(nextLine, x - 1, (3 * ratio) / 16) // 左下
  }
  addRGB(nextLine, x, (5 * ratio) / 16) // 下
}

// ディザ処理
export const dithering = (sharpIns: sharp.Sharp, ratio = 1.0): Promise<sharp.Sharp> =>
  sharpIns
    .raw()
    .toBuffer({ resolveWithObject: true })
    .then(({ data, info }) => {
      const [w, h, ch] = [info.width, info.height, info.channels]
      const byteArray = new Uint8ClampedArray(data)
      const srcLine: number[] = Array.from(byteArray.subarray(0, w * ch))
      const nextLine: number[] = Array.from(byteArray.subarray(w * ch, w * ch * 2))
      for (let y = 0; y < h; y++) {
        for (let x = 0; x < w; x++) {
          const c0 = srcLine.slice(x * ch, x * ch + 3) as RGB
          const c1 = nearestPaletteColor(c0, PALETTE)
          const e = math.subtract(c0, c1)
          c1.forEach((v, i) => {
            srcLine[x * ch + i] = v
          })
          diffuseError(e, x, srcLine, nextLine, info, ratio)
        }
        byteArray.set(new Uint8ClampedArray(srcLine), y * w * ch)
        nextLine.forEach((v, i) => {
          srcLine[i] = v
          nextLine[i] = y < h - 1 ? byteArray[(y + 1) * w * ch + i] : 0
        })
      }
      return sharp(byteArray, {
        raw: {
          width: w,
          height: h,
          channels: ch,
        },
      })
    })
変換サンプル
以下は 7 色に減色した画像の例です。電子ペーパーで表示すると彩度が下がるため、元データの彩度を上げています。

転送用データへの変換
7 色に減色した色情報は 4 ビットに収まるので、2 ピクセル分のデータを 1 バイトにまとめます。このデータを HTTP サーバーに配置します。
XIAO ESP32C3
電子ペーパーを SPI で制御するための Arduino ライブラリが Waveshare 社から提供されています。これをプロジェクトフォルダに配置し、配線したピン番号をヘッダファイルepdif.hの定義に反映します。
起動後の処理の流れは次のとおりです。
- WiFi に接続して NTP で時刻を補正
- 画像データを HTTP で受信しながら SPI で送信して画面を更新
- AM 0:00 までディープスリープ
ESP32C3 の SRAM 容量は 400KB で、受信した画像データを格納しておくのに十分なサイズのバッファが確保できません。なので今回は画像データを受信しながら SPI に転送しています。
ESP32 にはフラッシュメモリの一部をストレージとして使う SPIFFS という機能があり、そこを一時保存領域として使う方法もあります(ただし、書き込み回数などの制約があります)。
以下は Arduino のソースコードです。エラー処理などは省略しています。
サンプルコード
#include <Arduino.h>
#include <esp_wifi.h>
#include <WiFiClientSecure.h>
#include <WiFi.h>
#include <HTTPClient.h>
#include "wifi_secret.h" // WIFI_SSID, WIFI_PASS
#include <SPI.h>
#include "epd7in3f.h"
#include <sys/time.h>
#include <esp_sntp.h>
// Constants
#define WIFI_CONNECTION_TIMEOUT (10 * 1000)
#define HTTP_ENDPOINT "http://192.168.1.100:3000"
#define TZ "JST-9"
#define NTP_SERVER "pool.ntp.org"
// #define SCREEN_UPDATE_INTERVAL (60 * 60)
// Variables
HTTPClient http;
Epd epd;
static RTC_DATA_ATTR int bootCount = 0;
uint8_t httpBuff[1024 * 10] = {0};
// Functions
bool httpGetAndUpdateEpaper(const char *param = "");
void startDeepSleep(time_t duration);
const char *getCurrentTimeString(time_t t = 0);
time_t getSecondsUntilAMZero();
//
void setup()
{
Serial.begin(115200);
delay(1000);
++bootCount;
Serial.println("Boot number: " + String(bootCount));
Serial.printf("Wakeup cause: %d\n", esp_sleep_get_wakeup_cause());
Serial.printf("Heap: %d / %d\n", ESP.getFreeHeap(), ESP.getHeapSize());
Serial.printf("Largest Free: %d\n", heap_caps_get_largest_free_block(MALLOC_CAP_8BIT));
// WiFi
Serial.printf("Connecting to %s\n", WIFI_SSID);
unsigned long timeoutTime = millis() + WIFI_CONNECTION_TIMEOUT;
WiFi.begin(WIFI_SSID, WIFI_PASS);
while (WiFi.status() != WL_CONNECTED) {
delay(500);
Serial.print(".");
if (millis() >= timeoutTime) {
Serial.println("WiFi Connection Timeout");
return;
}
}
Serial.println("\nWiFi connected.");
Serial.print("IP address: ");
Serial.println(WiFi.localIP());
// SNTP
Serial.println("configTzTime()");
configTzTime(TZ, NTP_SERVER);
Serial.printf("Current Time: %s\n", getCurrentTimeString());
while (sntp_get_sync_status() == SNTP_SYNC_STATUS_RESET)
delay(100);
Serial.printf("Adjusted Time: %s\n", getCurrentTimeString());
// E-Paper
Serial.println("e-Paper init");
int epdInitRet = epd.Init();
if (epdInitRet != 0) {
Serial.println("e-Paper init failed");
return;
}
// HTTP GET
httpGetAndUpdateEpaper();
//
WiFi.disconnect(true);
}
void loop()
{
time_t duration = getSecondsUntilAMZero();
#ifdef SCREEN_UPDATE_INTERVAL
duration %= SCREEN_UPDATE_INTERVAL;
#endif
startDeepSleep(duration);
}
bool httpGetAndUpdateEpaper(const char *param)
{
char url[256] = {0};
char userAgent[256] = {0};
sprintf(url, "%s/?%s", HTTP_ENDPOINT, param);
sprintf(userAgent, "%s %s %s", __FILE__, __DATE__, __TIME__);
//
Serial.printf("HTTP GET: %s\n", url);
http.setUserAgent(userAgent);
http.begin(url);
//
int code = http.GET();
if (code != 200) {
Serial.printf("HTTP Status: %d\r\n", code);
return false;
}
//
int len = http.getSize();
if (len == 0) {
Serial.printf("Content-Length: %d\r\n", len);
return false;
}
// 1. データ送信開始
epd.SendCommand(0x10);
//
WiFiClient *stream = http.getStreamPtr();
int readSize = 0;
while (http.connected() && (len > 0 || len == -1))
{
size_t size = stream->available();
if (size) {
int c = stream->readBytes(httpBuff, MIN(sizeof(httpBuff), size));
for (int i = 0; i < c; i++) {
// 2. 画素データ送信
epd.SendData(httpBuff[i]);
}
if (len > 0) {
len -= c;
readSize += c;
}
Serial.print(".");
}
delay(1);
}
Serial.println("");
// 3. ディスプレイON
epd.TurnOnDisplay();
http.end();
// 4. スリープ
epd.Sleep();
Serial.printf("httpGet(): Done. readSize=%d\n", readSize);
return true;
}
void startDeepSleep(time_t duration)
{
Serial.printf("Enter deep sleep. duration=%d\n", duration);
// Serial.flush();
esp_wifi_stop();
delay(100);
esp_sleep_enable_timer_wakeup(duration * 1000000ULL);
esp_deep_sleep_start();
}
// 時刻を表す文字列を返す
const char *getCurrentTimeString(time_t t)
{
static char buf[30];
struct tm timeInfo;
if (t <= 0) {
t = time(NULL);
}
localtime_r(&t, &timeInfo);
strftime(buf, sizeof(buf), "%Y-%m-%d %H:%M:%S", &timeInfo);
return buf;
}
// AM0:00までの秒数取得
time_t getSecondsUntilAMZero()
{
struct tm timeInfo;
time_t currentTime = time(NULL);
//
localtime_r(¤tTime, &timeInfo);
//
timeInfo.tm_min = 0;
timeInfo.tm_sec = 0;
timeInfo.tm_hour = 0;
timeInfo.tm_mday += 1;
//
return mktime(&timeInfo) - currentTime;
}
おわりに
デジタルサイネージや電子書籍端末、電子棚札など、身近な生活場面で電子ペーパーを見かけることが増えてきました。最近は従来より表示性能が向上したモジュールも続々と登場しており、活用の幅はさらに広がりそうです。


Discussion