
はじめに
こんにちは、旅行 PF 部エンジニアの奥田です。
コードを変更するとデザインが変わることは避けられません。その都度変更を確認するのは開発の一部ですよね。
影響範囲が広い変更を行った場合、確認すべきページ・箇所が増えてしまい、結果として時間や手間が増大し、それがストレスになります。
特に、大規模な変更を含む開発用ブランチをメインブランチにマージする際に、意図せぬ画面表示変更が混入していないことを確認することは、必須の作業になります。
日々の開発を進める中で、これを繰り返し行うのはなかなかに大変です。
そこで、噂には聞いていた VisualRegressionTest(視覚的回帰テスト) を触っていきます。
VRT(Visual Regression Test) とは
VRT はその名の通り、「視覚的な回帰テスト」を指します。このテストは UI のスクリーンショットを撮り、それを以前撮影されたスクリーンショットと比較することで画面上の変更を検知します。これにより意図しない画面の変更を素早く検知できます。
使用するツール
今回の VRT を実施するために、Playwrightとreg-suitを使用しています。
Playwrightはブラウザ操作を自動化してのテストやスクレイピングを行うツールです。今回はスクリーンショットを撮るために使用しています。
一方、reg-suitは、VRT に特化したツールです。複数の画像表示方法があり、差分を確認しやすいため使用しています。
Playwright単体でも VRT を実施できますが、より差分を確認しやすくするため、reg-suitと組み合わせて使用します。
Playwright と reg-suit の設定
今回の設定は、CI ではなくローカル環境で実行することを前提としています。
ローカルのみで実行する理由としては、VRT を試すことに注力するためです。
スクショ撮るぞ withPlaywright
画面の差分を出すためには、画面のスクリーンショットを撮る必要があるため、今回はPlaywrightを使って撮っていきます。
VRT 部分がメインのため、Playwrightはさらっとやっていきます。
Playwrightのインストールと設定
npm init playwright@latestでさらっとインストールと設定します。
全部デフォルトの設定でヨシッ!!
スクショを撮るぞ
例えば、Doodles のページを比較するためのスクショを撮る場合、下記のような簡単なコードになります。
import { test, expect } from "@playwright/test";

test("Doogle", async ({ page }) => {
	// 対象ページへ遷移
	await page.goto("https://google.com/doodles", {
		waitUntil: "load",
	});

	// ネットワークが安定するまで待機
	await page.waitForLoadState("networkidle");

	// スクリーンショットを撮影
	await page.screenshot({
		path: "directory_contains_actual_images/top.png",
		fullPage: true,
	});
});
VRT やっていくぞ with reg-suit
ここからが 本題の VRT 部分 になります。
Visual Regression Testing Suit 略して、reg-suitで VRT を実施していきます。
reg-suit はプラグインを追加することで、S3 や Slack、Github と連動させ、 CI で使用することがメインに作られています。ですが、今回は CI ではなくローカルで動かして VRT の動きを確認していきます。
インストールと設定をやっていくぞ
とりあえず公式に則り global にインストールします。
npm install -g reg-suit
その後にreg-suit initで初期設定です。
どのプラグインをインストールするか聞かれますが、今回は使用しないのですべて外します。
$ reg-suit init
[reg-suit] info version: 0.12.1
? Plugin(s) to install (bold: recommended) (Press <space> to select, <a> to toggle all, <i>
to invert selection, and <enter> to proceed)
❯◯  reg-keygen-git-hash-plugin : Detect the snapshot key to be compare with using Git hash.
 ◯  reg-notify-github-plugin : Notify reg-suit result to GitHub repository
 ◯  reg-publish-s3-plugin : Fetch and publish snapshot images to AWS S3.
 ◯  reg-notify-chatwork-plugin : Notify reg-suit result to Chatwork channel.
 ◯  reg-notify-github-with-api-plugin : Notify reg-suit result to GHE repository using API
 ◯  reg-notify-gitlab-plugin : Notify reg-suit result to GitLab reposit
その後に下記のことが聞かれますがデフォルトで設定していきます。
- 作業ディレクトリの場所(
? Working directory of reg-suit.) - .gitignore に
.regを追加してもよいか(? Append ".reg" entry to your .gitignore file.) - 最新のスクショを保存するディレクトリの場所(
? Directory contains actual images.) - 変更があると判断するしきい値(
Threshold, ranges from 0 to 1. Smaller value makes the comparison more sensitive.) - 設定ファイルを更新して良いか(
? Update configuration file) - サンプルファイルを作業ディレクトリに配置して良いか(
? Copy sample images to working dir)
$ reg-suit init
[reg-suit] info version: 0.12.1
? Plugin(s) to install (bold: recommended)
[reg-suit] info This project does not have local installed reg-suit, so install it.
[reg-suit] info Install dependencies to the local directory. This procedure takes some minutes, please wait.
? Working directory of reg-suit. .reg
? Append ".reg" entry to your .gitignore file. Yes
? Directory contains actual images. directory_contains_actual_images
? Threshold, ranges from 0 to 1. Smaller value makes the comparison more sensitive. 0
[reg-suit] info Configuration:
[reg-suit] info {
  "core": {
    "workingDir": ".reg",
    "actualDir": "directory_contains_actual_images",
    "thresholdRate": 0,
    "addIgnore": true,
    "ximgdiff": {
      "invocationType": "client"
    }
  },
  "plugins": {}
}
? Update configuration file Yes
? Copy sample images to working dir Yes
[reg-suit] info Initialization ended successfully ✨
[reg-suit] info Execute 'reg-suit run' ⭐
実行やっていくぞ
インストールが終わったので、reg-suit runで実行を確認します。
$ reg-suit run
[reg-suit] info version: 0.12.1
[reg-suit] info Skipped to detect the previous snapshot key because key generator plugin is not set up.
[reg-suit] info Skipped to fetch the expected data because expected key is null.
[reg-suit] info Comparison Complete
[reg-suit] info    Changed items: 0
[reg-suit] info    New items: 1
[reg-suit] info    Deleted items: 0
[reg-suit] info    Passed items: 0
[reg-suit] info Use 'snapshot_1686098950' as the current snapshot key because key generator plugin is not set up.
[reg-suit] info Skipped to publish the snapshot data because publisher plugin is not set up.
[reg-suit] info Skipped to notify result because notifier plugins are not set up.
問題なく実行ができ、新しい画像が追加されたという形になりました。
実行結果は html で出力されています。

ローカルでreg-suitを実行するぞ
やっと準備が整いました!これから、VRT を実行するためにreg-suitを実行していきます。
ただし、reg-suitは、基本的に CI 環境向けに作られています。そのため、ローカル環境でスムーズに動かすことはできません。CI 環境ではスクリーンショットを S3 や GCS などのクラウドストレージに保存し、それを前回撮影したスクリーンショットと比較します。
ですので、ローカル環境で実行する場合、手動で比較対象のスクリーンショットを配置する必要があります。
reg-suit runの CI 環境での流れ
-
directory_contains_actual_imagesを.reg/actualにコピー - 以前のスクリーンショットをクラウドストレージから
.reg/expectedにダウンロードします -
.reg/actualと.reg/expectedのスクリーンショットを比較する -
.reg/index.htmlに差分レポートを出力する
CI 環境では、以前のスクリーンショットをクラウドストレージから取得する流れになっています。しかし、ローカル環境では事情が異なり、手動で比較対象のスクリーンショットを.reg/expectedに配置する必要があります。
ローカルでreg-suitを実行する準備
-
directory_contains_actual_imagesに最新のスクリーンショットを配置 -
.reg/expectedに以前のスクリーンショットを配置
上記のことを実施する必要があります。
実際にやっていきます
- 比較用スクリーンショットを撮る(
npx playwright test) - 比較データ用ディレクトリに移動させる(
mv directory_contains_actual_images/top.png .reg/expected) - 最新スクリーンショットを撮る(
npx playwright test) -
reg-suitを実行します(reg-suit run)
$ reg-suit run
[reg-suit] info version: 0.12.1
[reg-suit] info Skipped to detect the previous snapshot key because key generator plugin is not set up.
[reg-suit] info Skipped to fetch the expected data because expected key is null.
[reg-suit] info Comparison Complete
[reg-suit] info    Changed items: 1
[reg-suit] info    New items: 0
[reg-suit] info    Deleted items: 0
[reg-suit] info    Passed items: 0
[reg-suit] info Use 'snapshot_1686101630' as the current snapshot key because key generator plugin is not set up.
[reg-suit] info Skipped to publish the snapshot data because publisher plugin is not set up.
[reg-suit] info Skipped to notify result because notifier plugins are not set up.
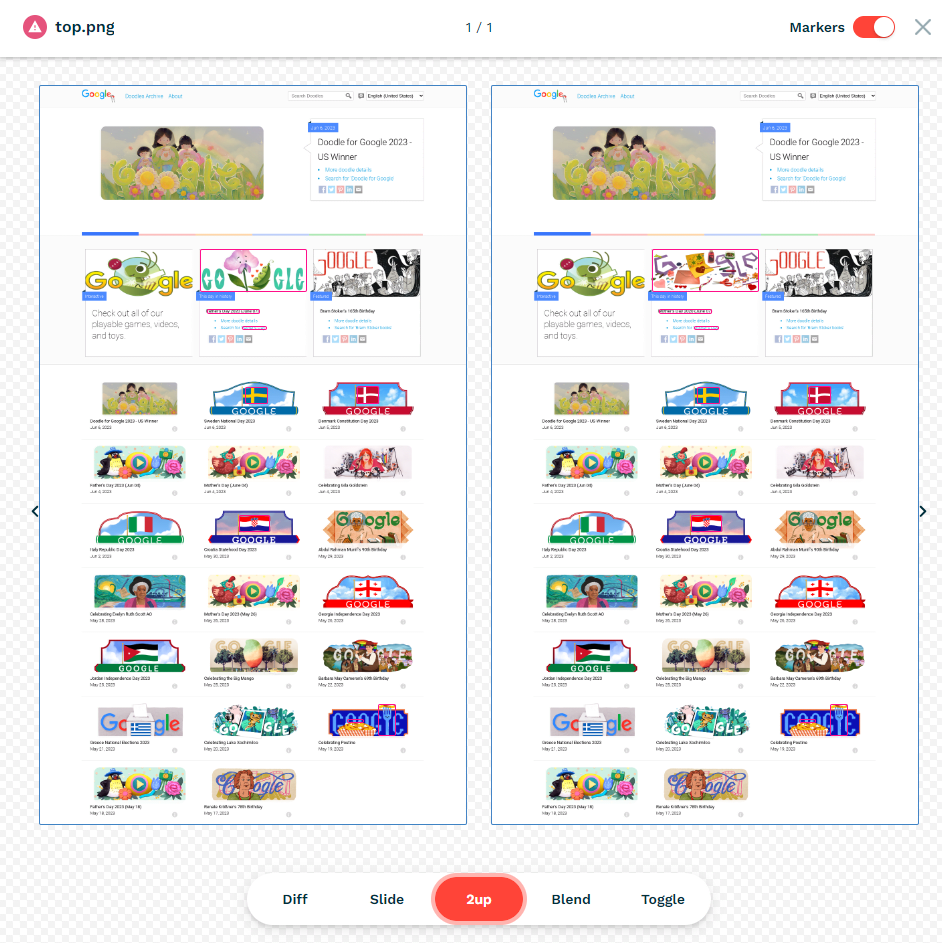
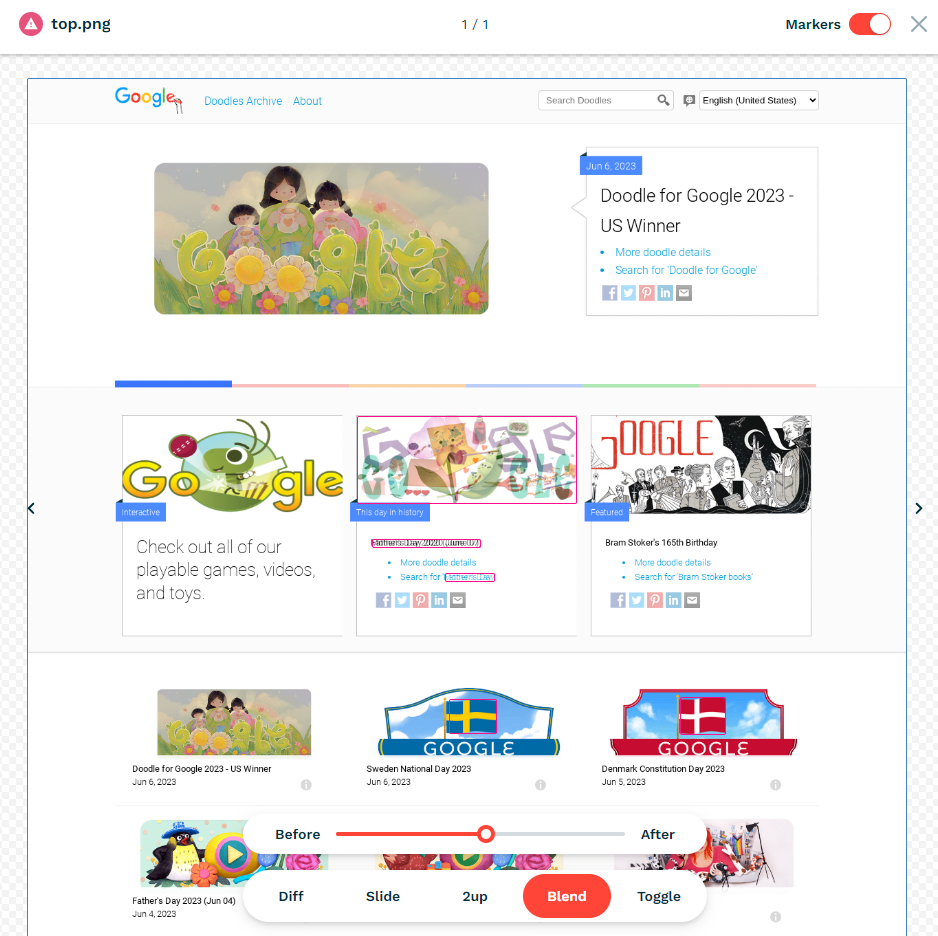
表示画面で見ていくぞ

変更を見る方法としては複数あります。Playwright の場合は、ピクセル単位の差分表示のみになるので、reg-suitの方が差分が確認しやすくなってます。
- ピクセル単位の差分を表示する
- スライドで Before・After を表示させる
- Before・After を隣り合わせで表示する
- Before・After を透過させ重ねて表示させる
- Before・After を Toggle で切り替えて表示させる


最後に
VRT を行うことで 300 画面のスクショを撮り、reg-suitで変更の差分を確認することで意図しない変更を見つけることができました。
複数環境で複数回実施したこともあり目で確認するより早く確認できました。それにより各環境へ安心してデプロイできました。
かなり作業が簡略化できて最高でした!!
今回の使用用途としては、大規模の変更で他環境に影響がないかを調べるためのテストツールとして使用しましたが、reg-suit自体は CI での実行が主眼に置かれているツールなので、今後は CI で実施していくように画策しています。

Discussion